Docs
How Weft Loom works, one thing at a time.
The window
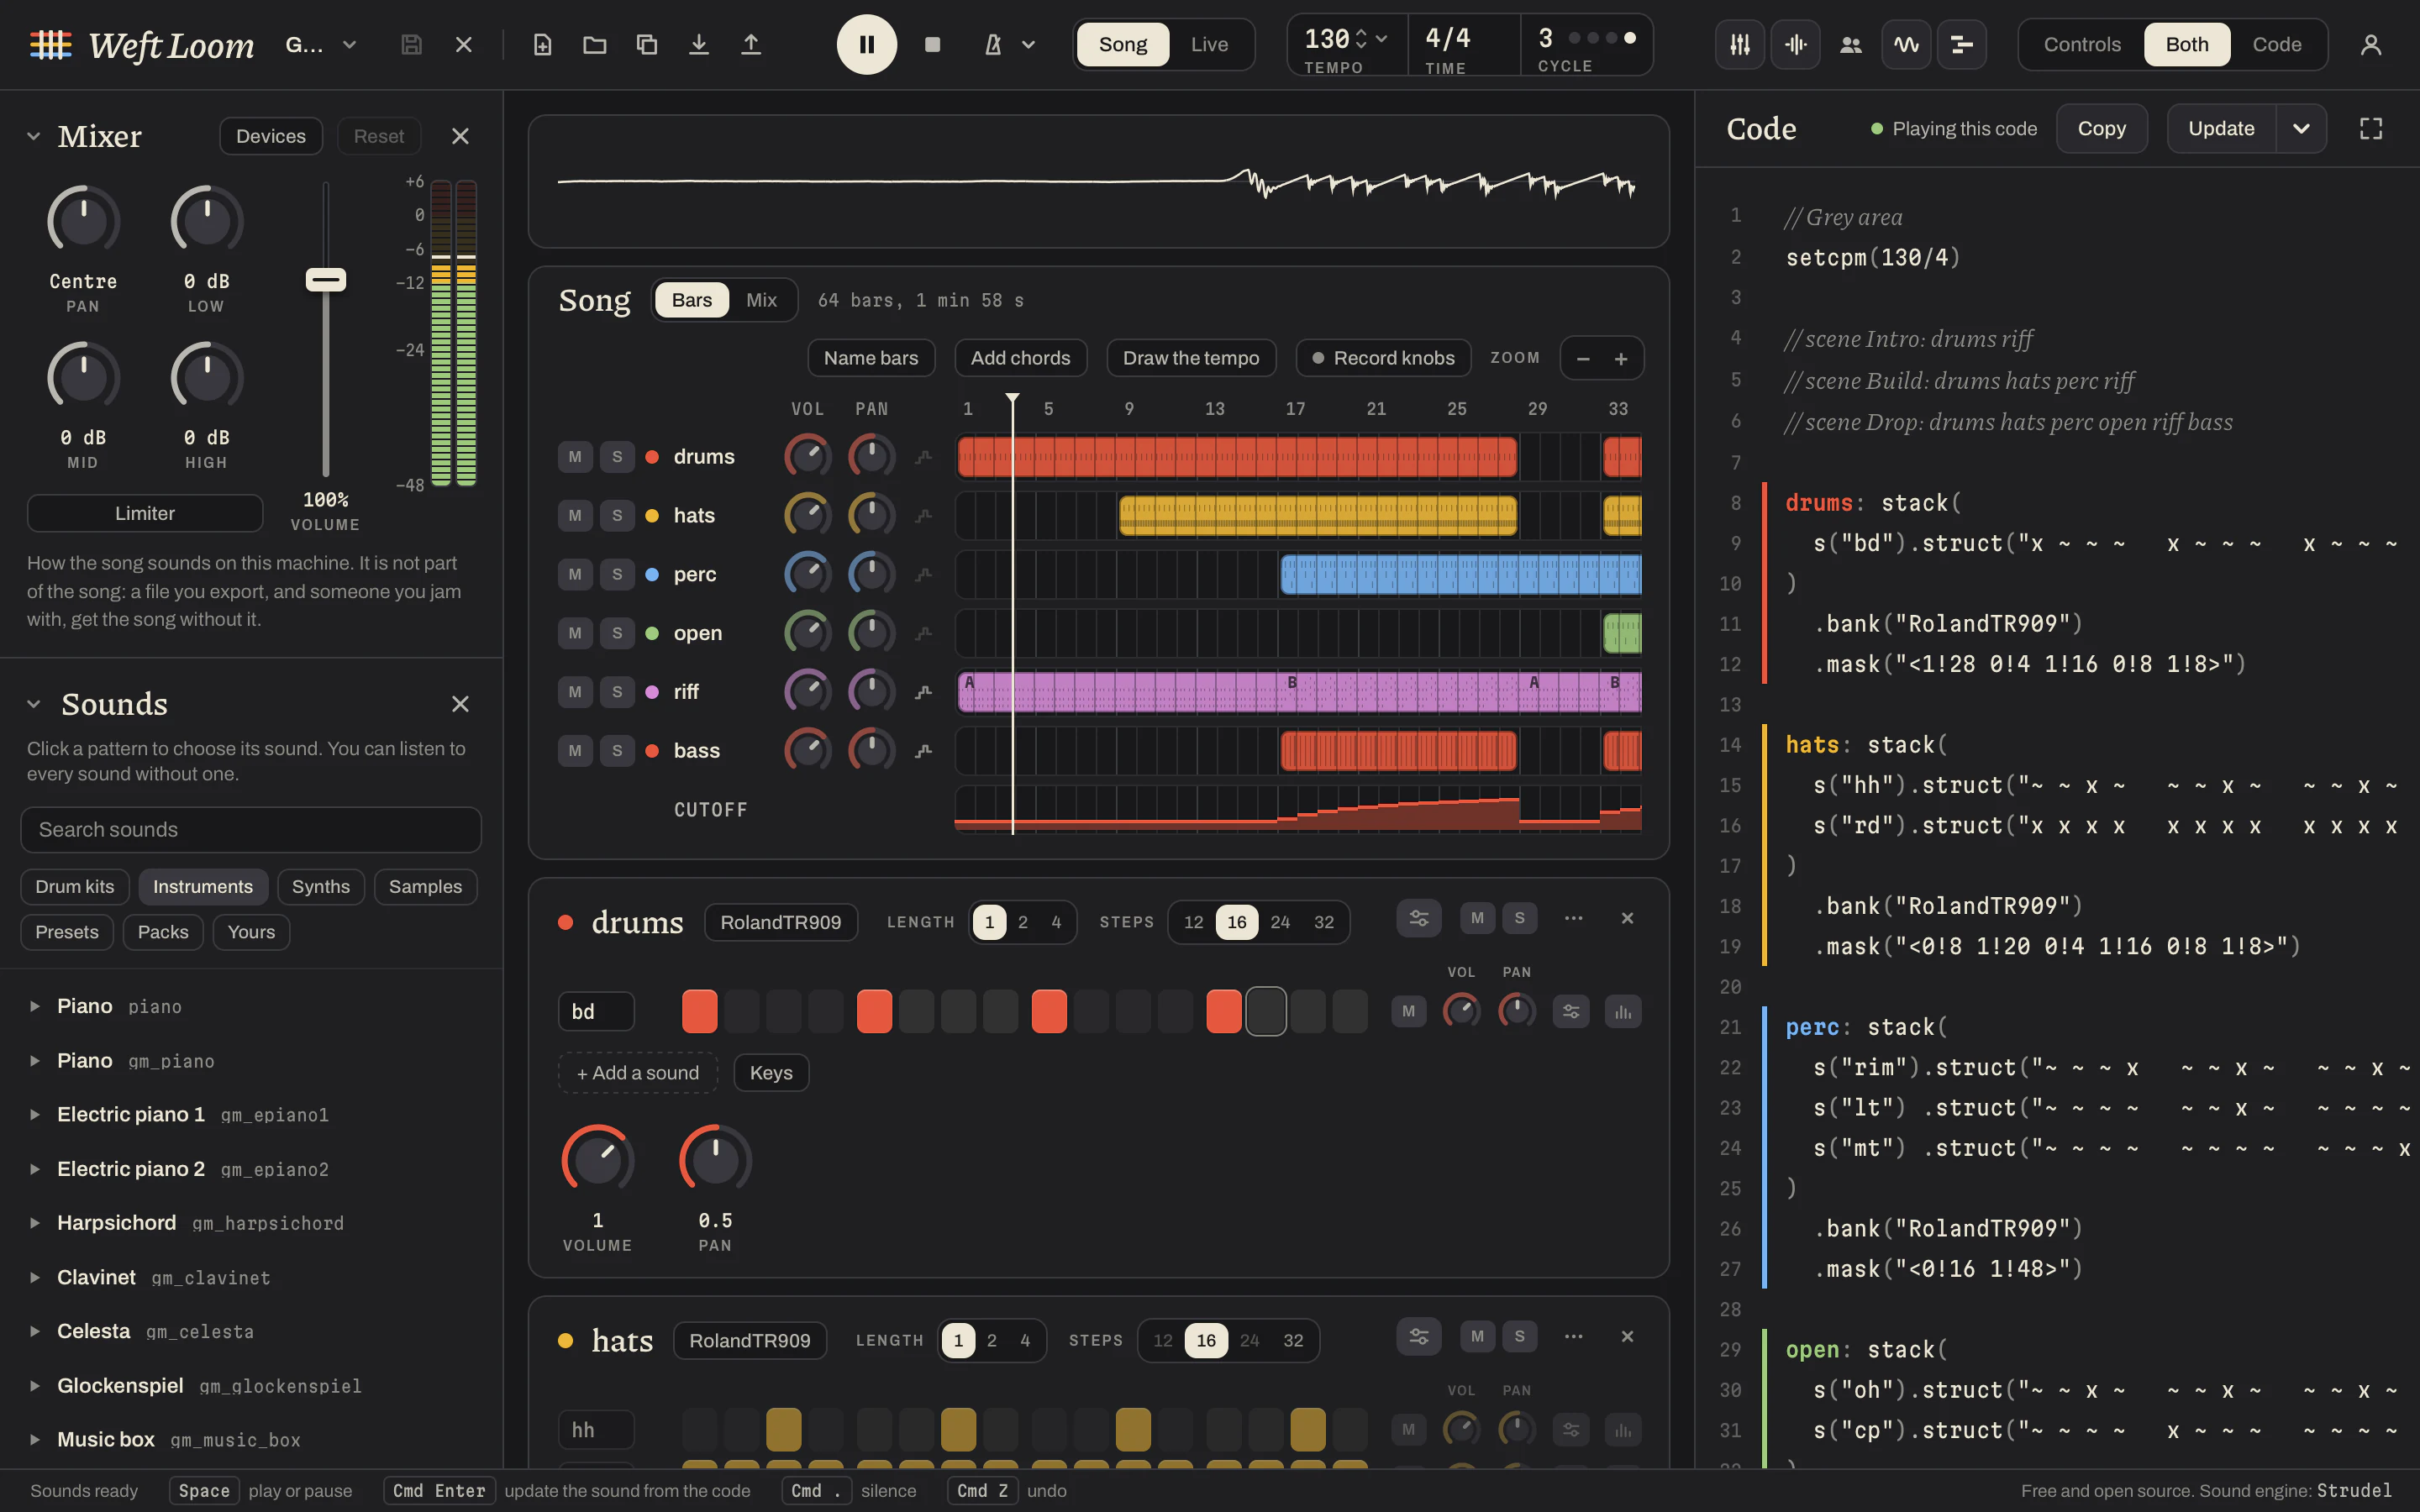
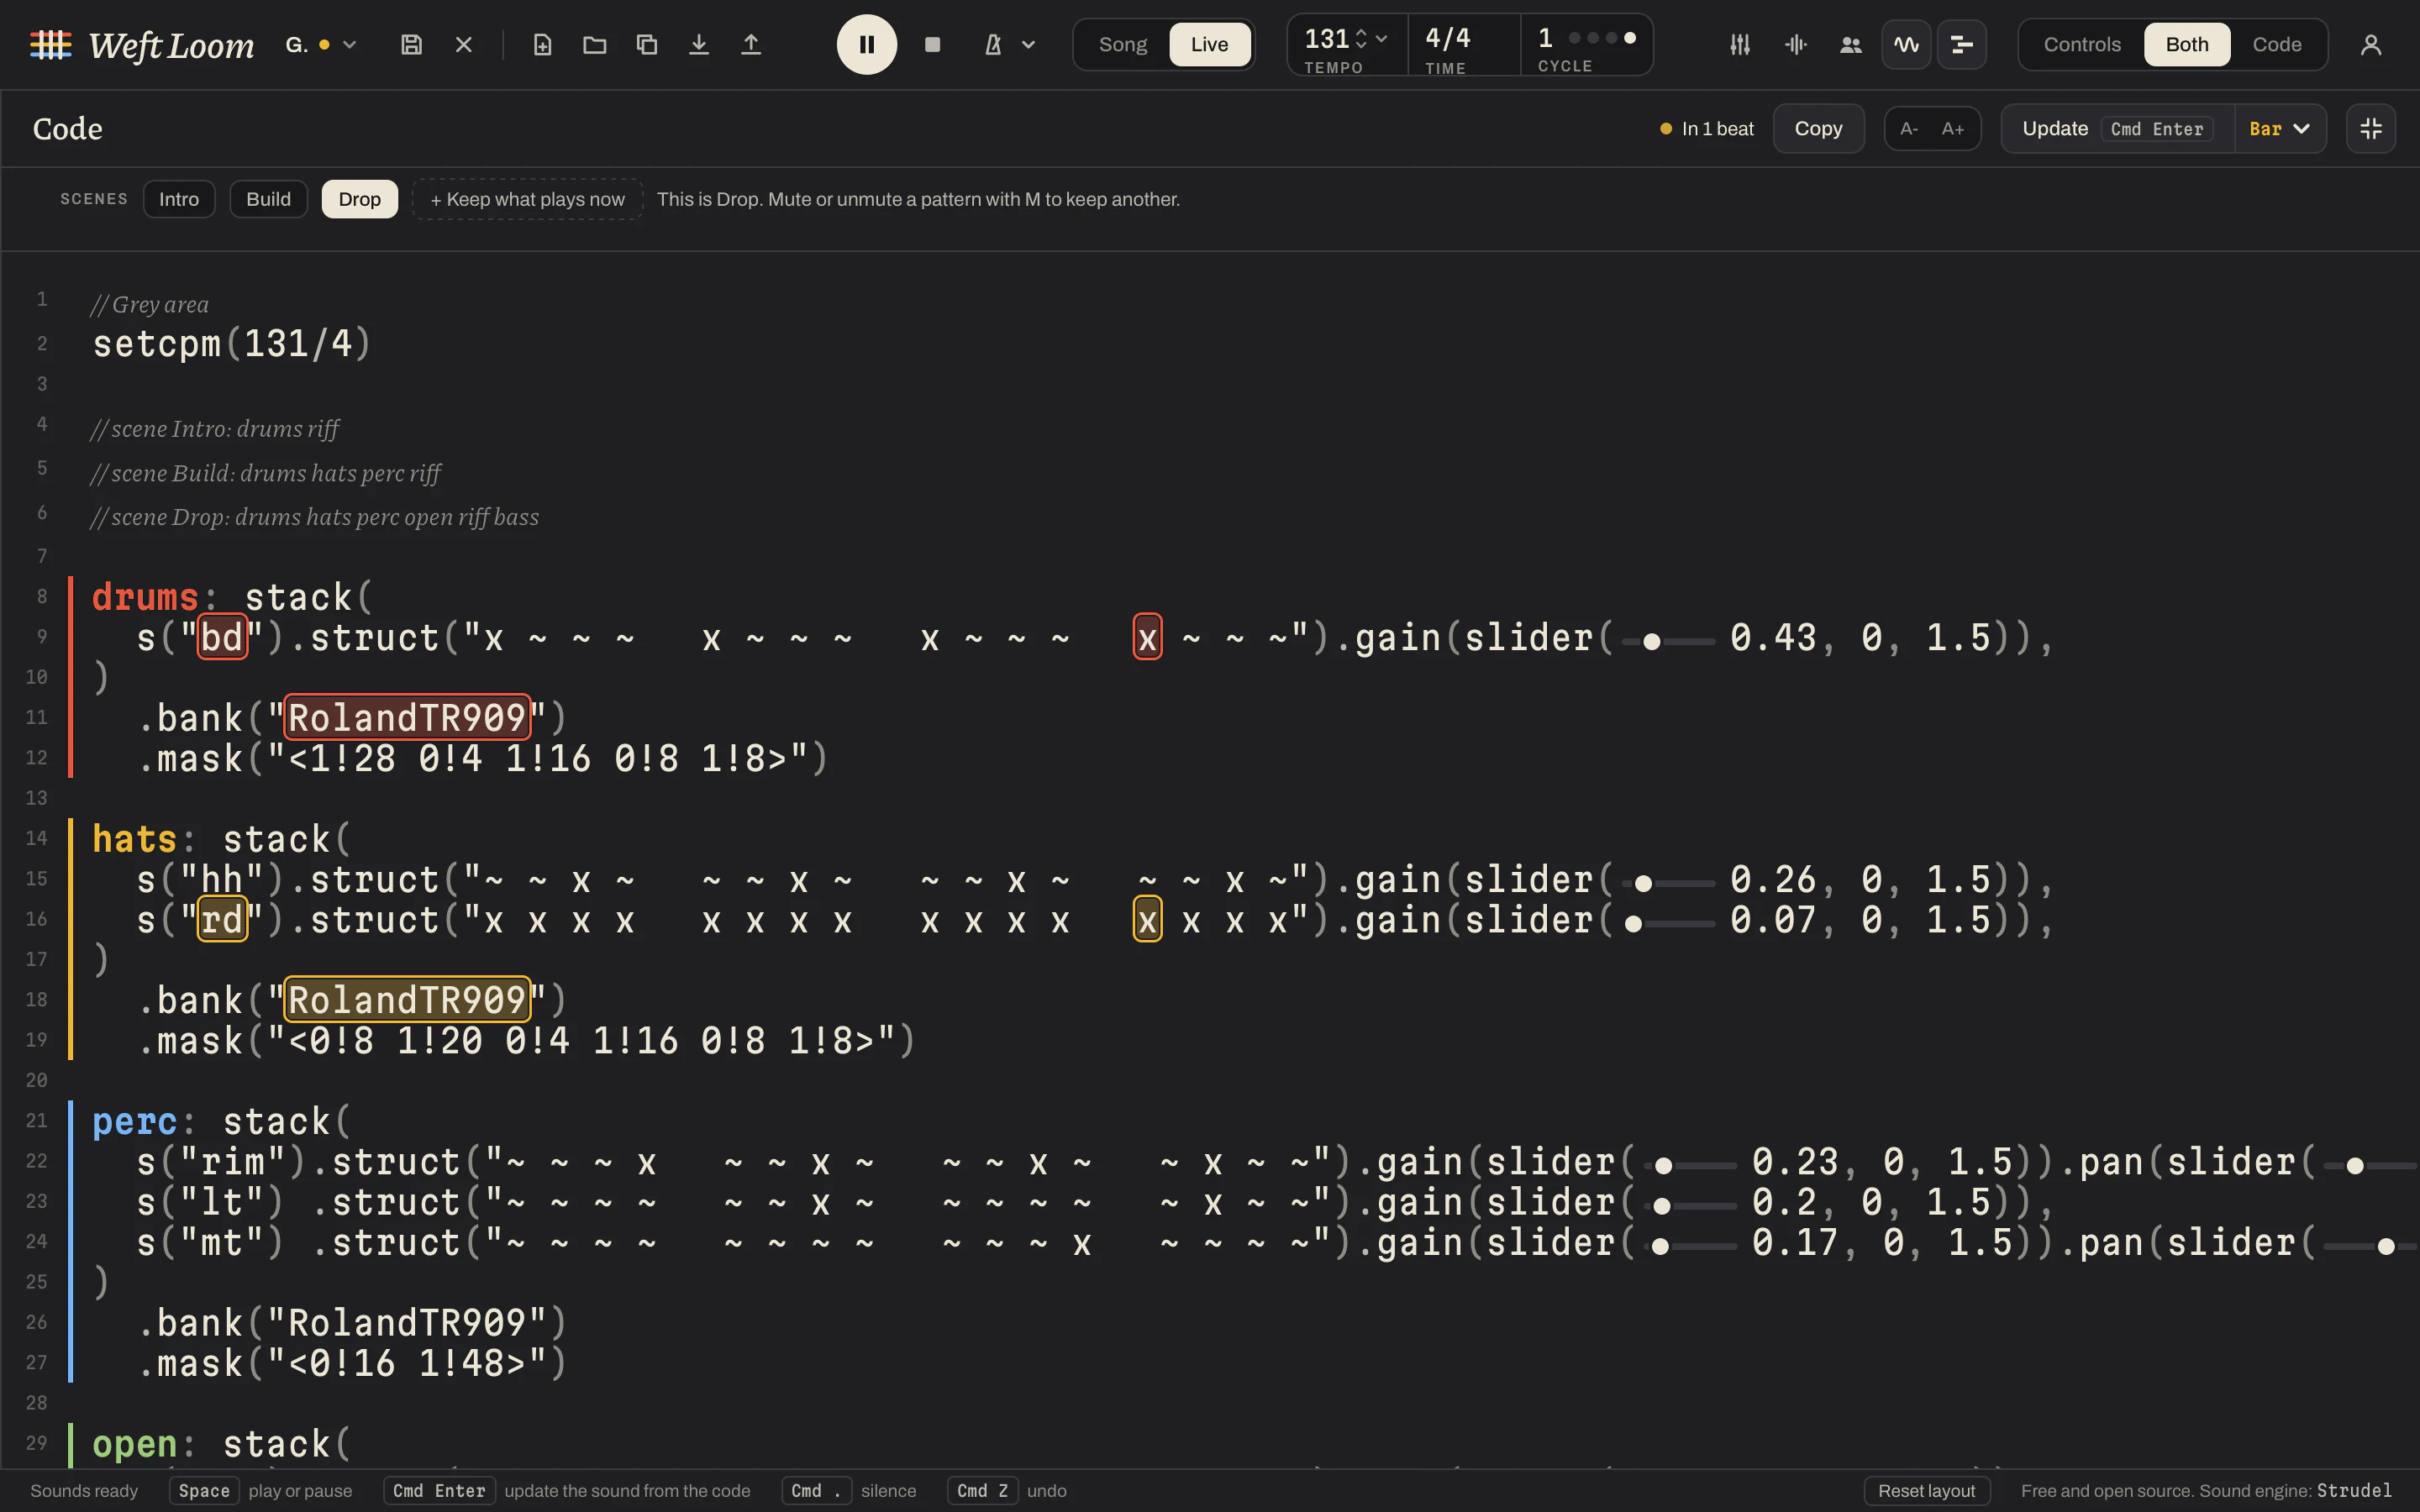
A song in Weft Loom is a handful of patterns: drums, a bass line, a melody. Each pattern has a strip in the middle of the window, where you click steps and notes and turn knobs. On the right is the song's code.
The strips and the code are the same song. Whatever you do in a strip is written into the code, and whatever you type into the code shows up in the strips, so you can use whichever suits you at the moment. The code is Strudel, and everything Strudel can do works here.
On the left are the Mixer and the Sounds. The icons at the top right show and hide each part of the window, and Controls, Both and Code choose between the strips, the code, or the two side by side.
Space plays and pauses. After typing in the code, Cmd Enter plays what you typed. Where this page says Cmd, it is Ctrl on Windows and Linux.
Beside Stop is the metronome: a click on every beat while the song plays, the first beat of each bar higher. The arrow next to it has the count-in: a bar of clicks before the song starts, whenever it starts, so you can come in on the beat. Neither is part of the song.
Beside the play button are Song and Live. Live plays every pattern round and round, which is what you want while trying things out, and is where a new song starts. Song plays the bars you laid out in the Song panel, from the first to the last.
Patterns
The row under the strips adds a pattern: Drums, Bass line, Chords or Melody.
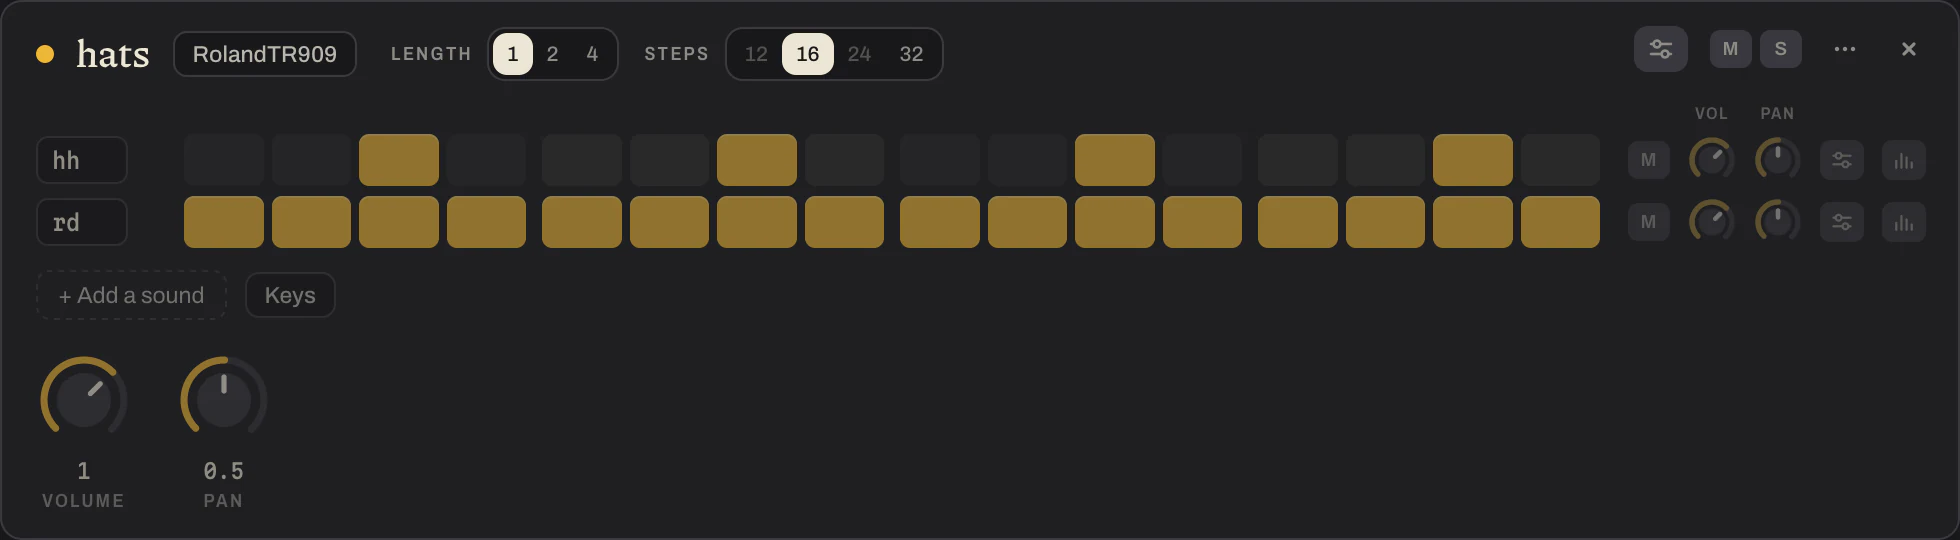
Drums are a grid. Click a step to put a hit there, and click it again to take it away. Press and drag along a row to fill every step you pass, or to empty them when the drag begins on a hit. Hold Shift and click to make a hit louder. Add a sound adds a row, and a click on a row's name plays that sound. Every row has its own mute, volume, pan and controls at its end. A right click on a sound's name opens a menu for its row: see Several at once.
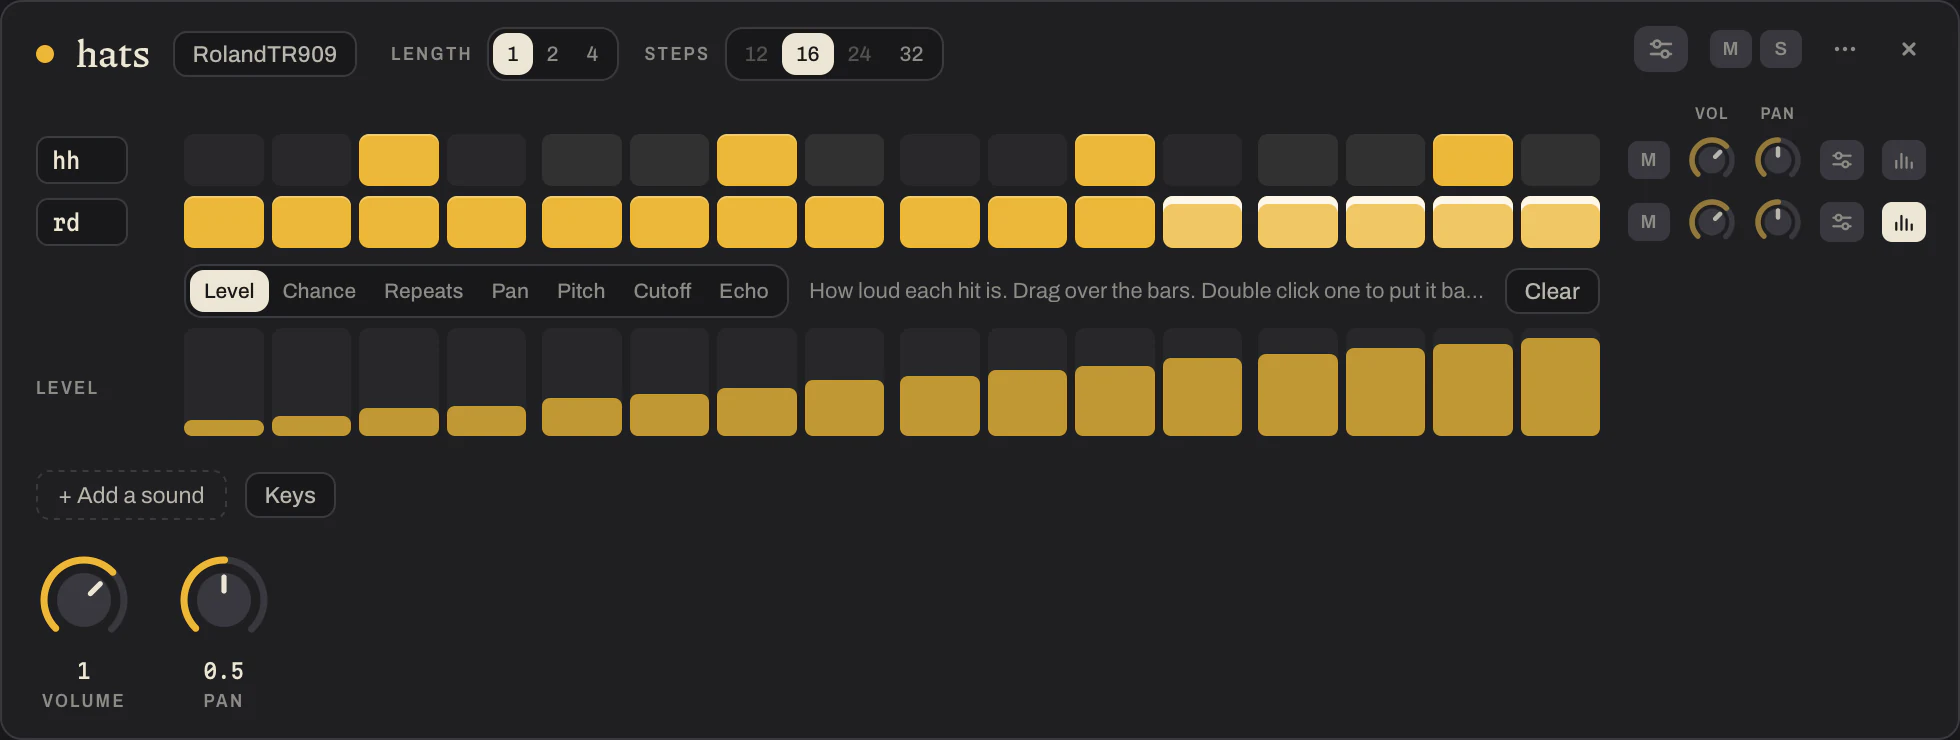
Each hit of a row can be its own. The button with the bars at the end of a row opens it step by step: drag over the bars to give every hit its level, and choose Chance, Repeats, Pan, Pitch, Cutoff or Echo to do the same with those. A hit with a chance plays only some of the times round, and a hit with repeats plays two, three or four times in its step.
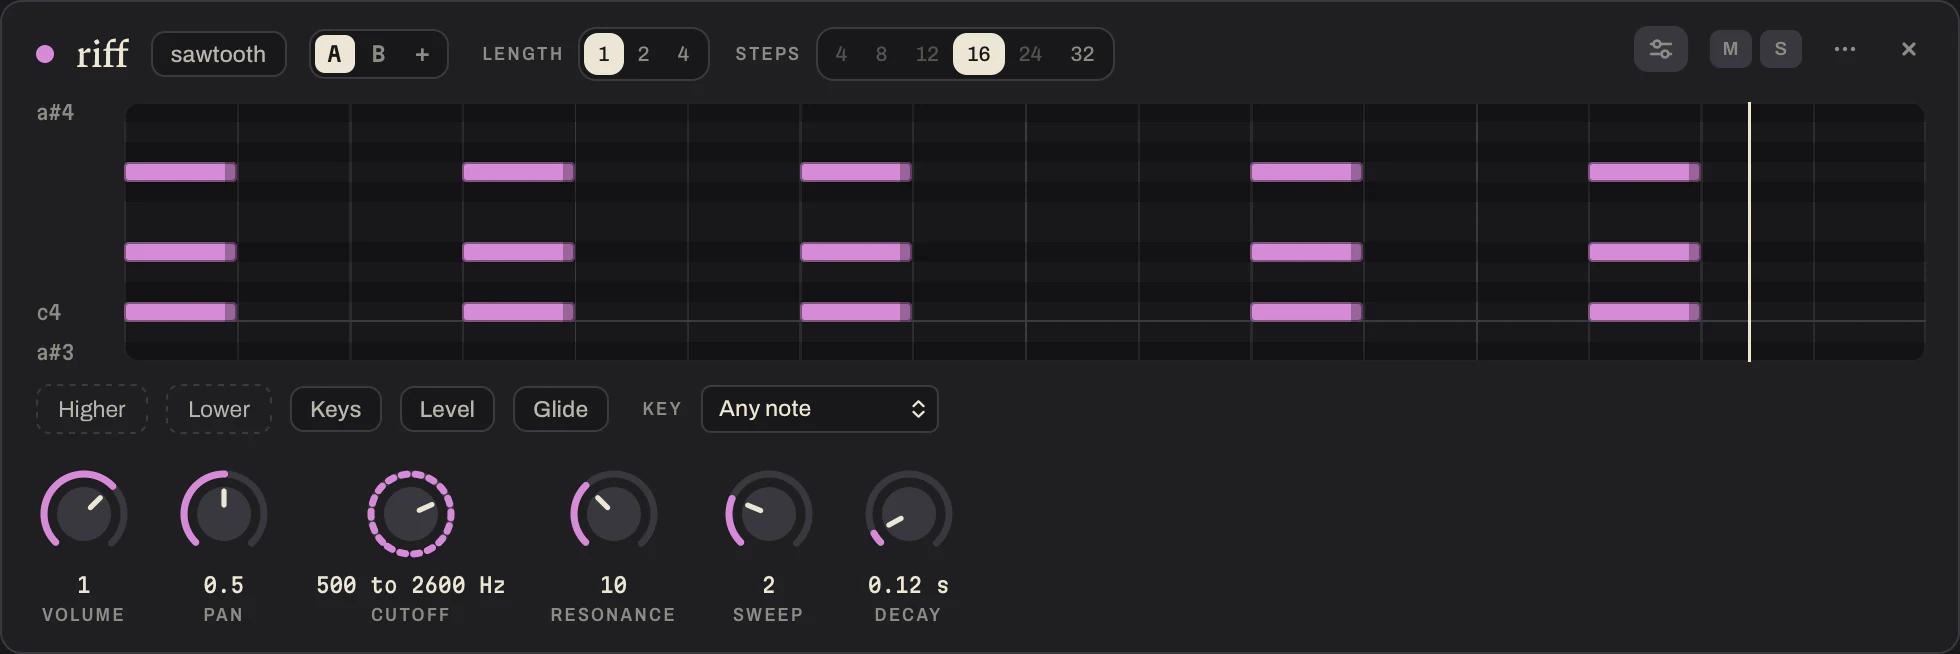
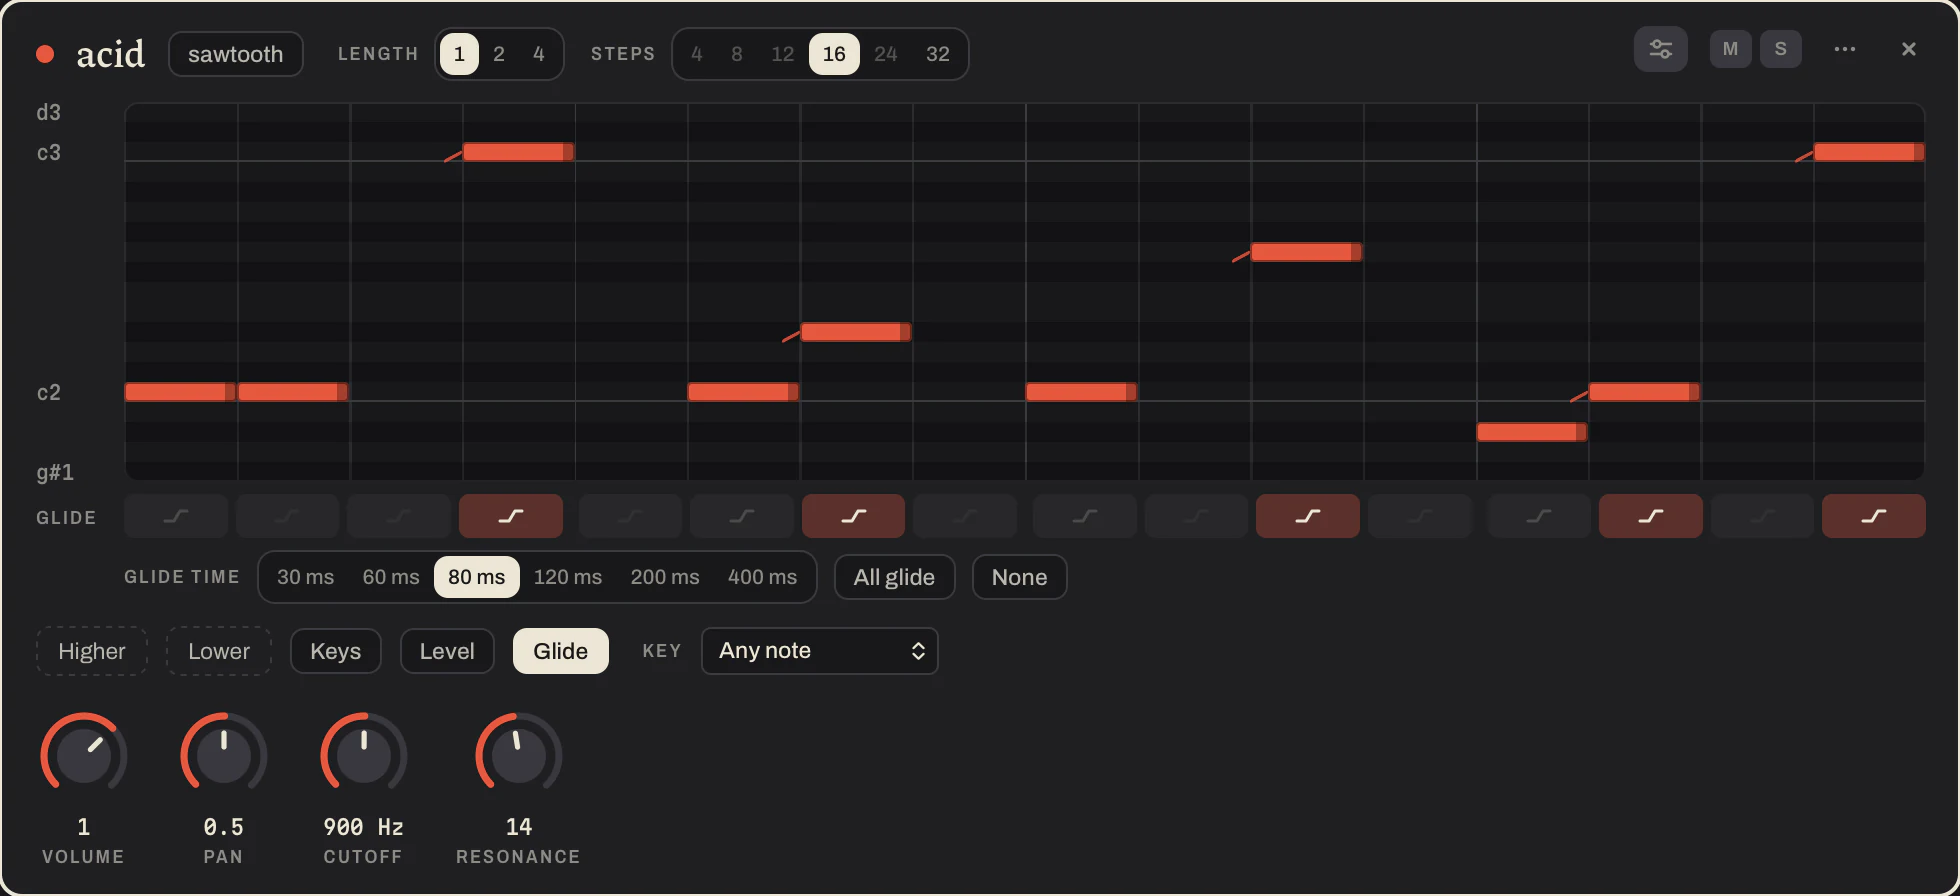
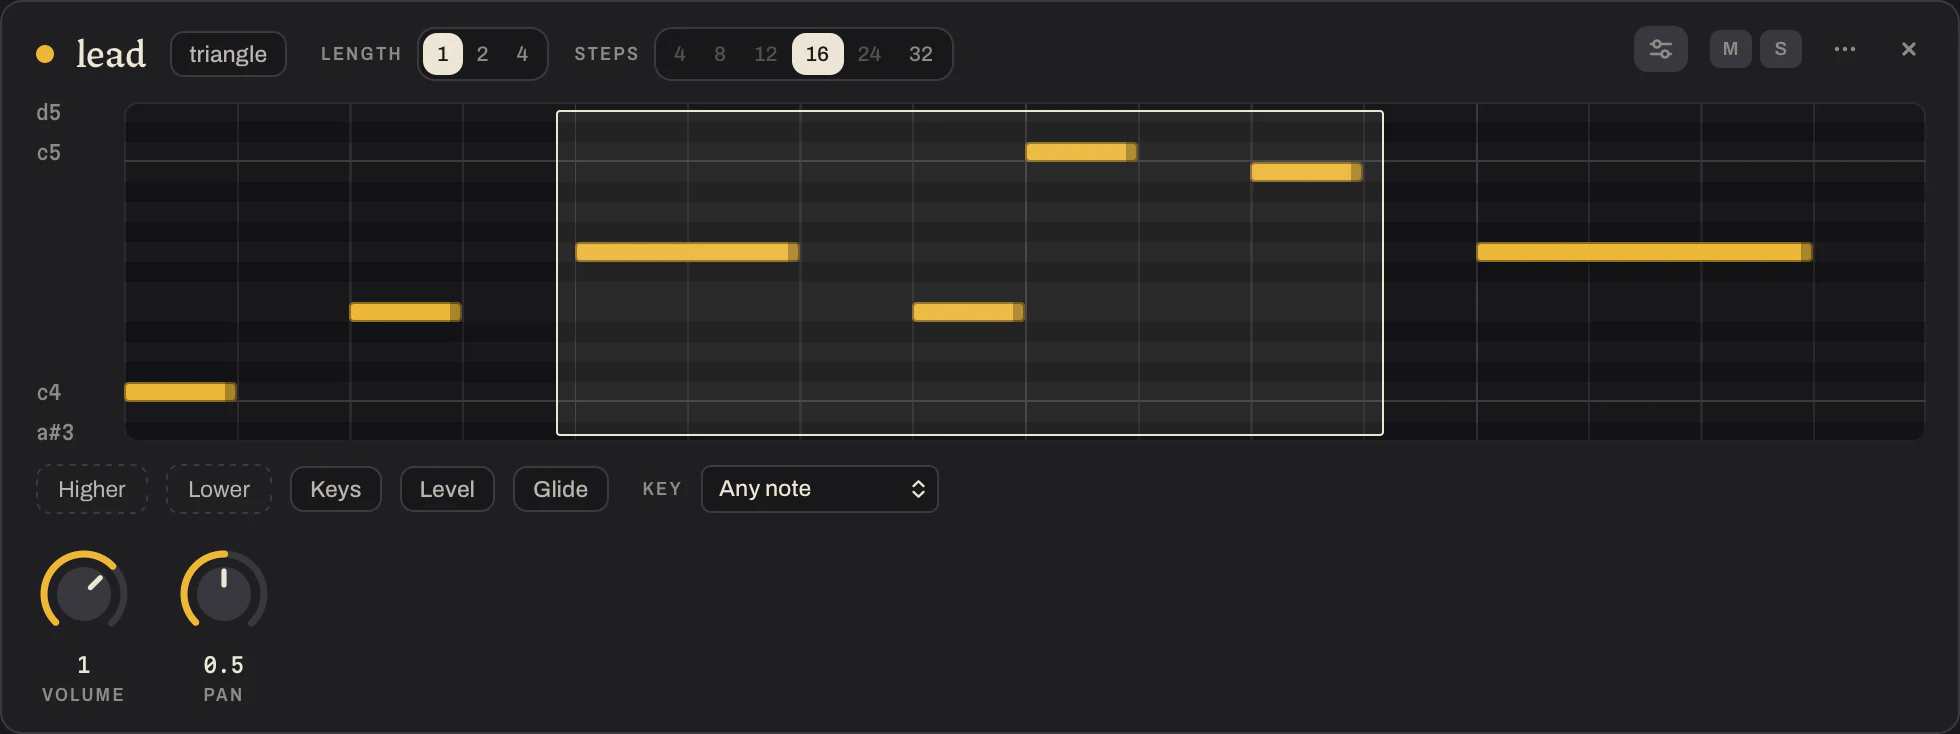
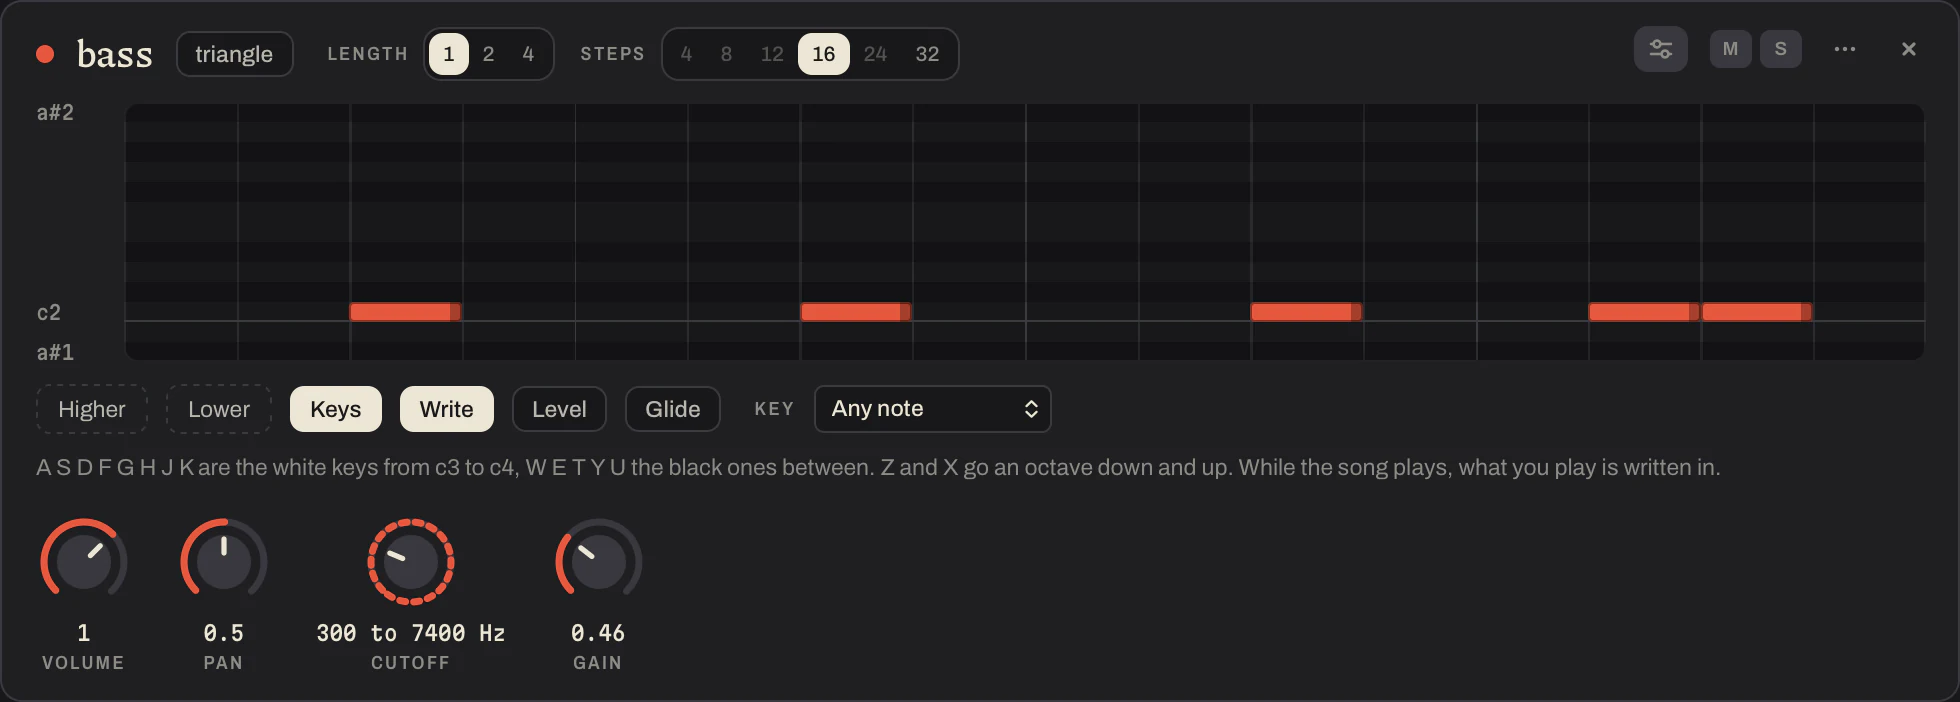
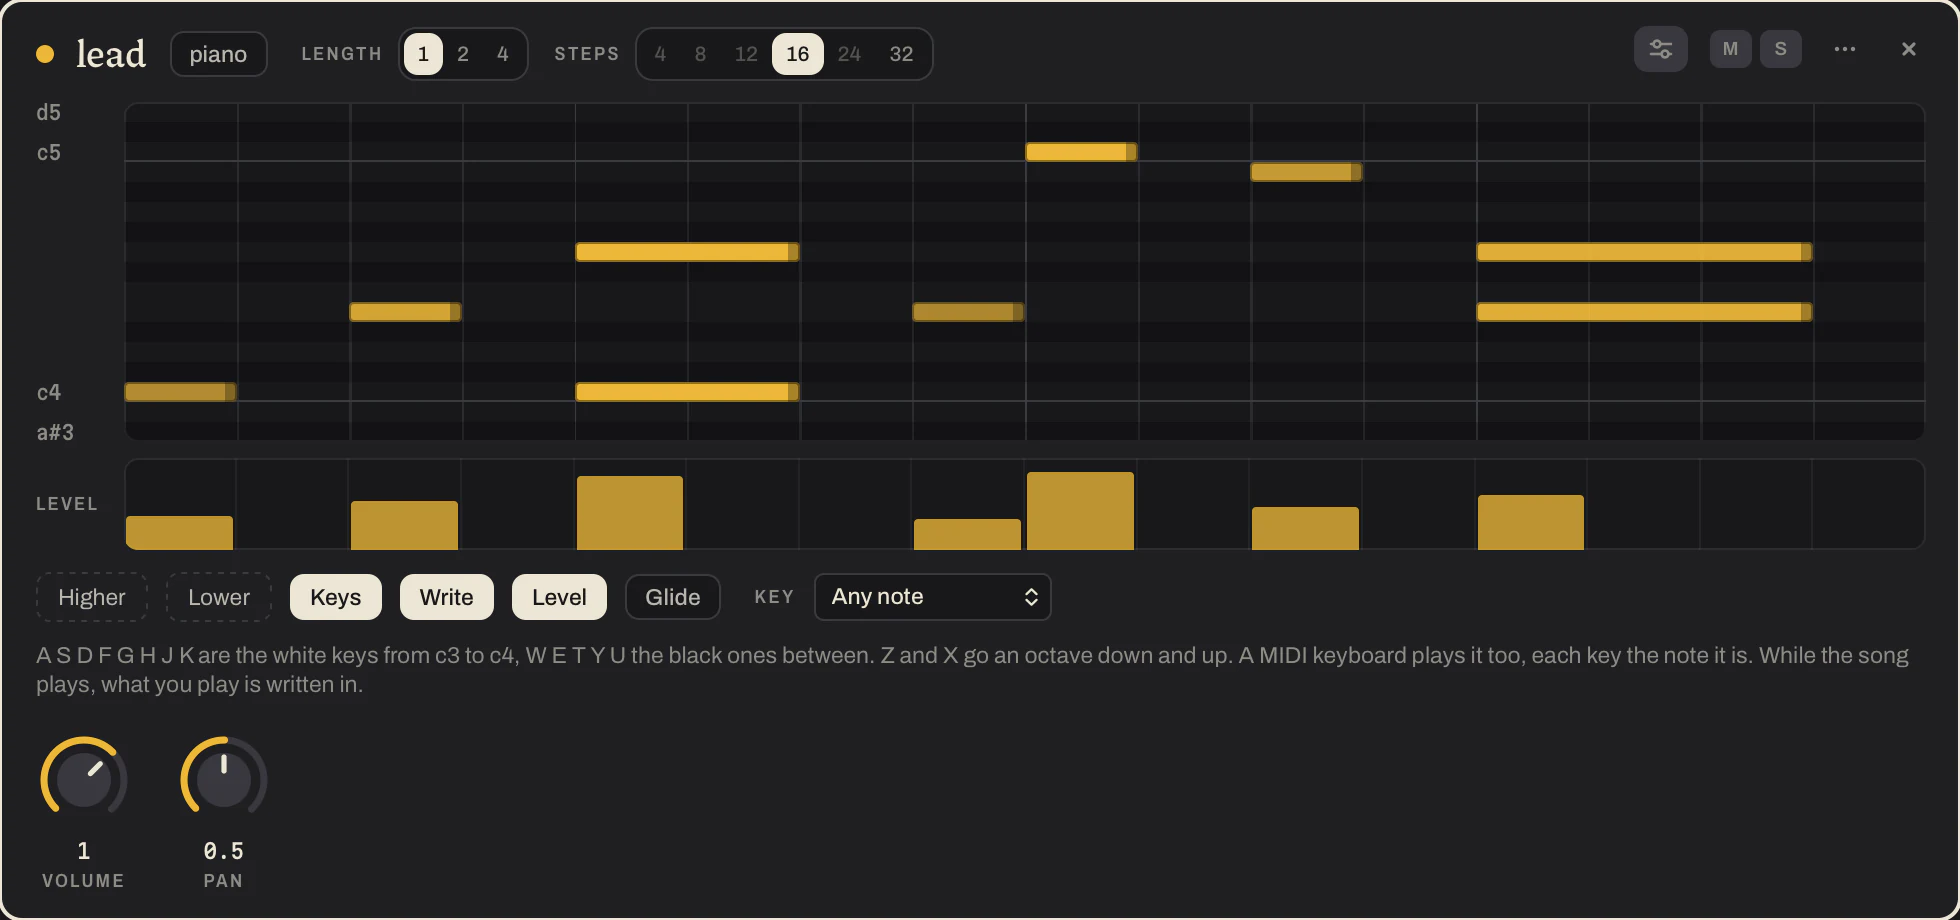
Notes are a piano roll. Click an empty cell for a note, or press there and drag to the right to draw one as long as the drag. Drag a note to move it, drag its right edge to make it longer, and double click it to remove it. Higher and Lower show more of the keyboard. Choose a Key and the roll keeps to the notes of that key; with Chords on, one click puts in the whole chord. Level puts a bar under the roll for every step a note starts on: drag over them to make notes louder or quieter.
Glide under the roll makes a note slide into its pitch from the note before it, as on an acid bass line. Switch it on for the step the note starts on, or press All glide. Glide time beside it is how long a slide takes, 80 thousandths of a second to begin with, the sound of an acid line. It works on a line of single notes: a step with a chord on it cannot glide.
Length is how many bars the pattern lasts before it comes round again. Steps is how finely a bar is divided: 16 is the usual, 12 and 24 divide each beat in three, for a shuffle or a swing. When a pattern is longer than one bar, Cycle pages through its bars.
At the right of a strip, M mutes the pattern and S plays it alone. The three dots rename, duplicate and move it, and the cross removes it. Under the grid or the roll are the pattern's knobs, with Volume and Pan first.
Several at once
Hold Shift and drag a box over notes in a roll, or over steps in a grid, to choose them. In a roll Shift and a click adds a note; in a grid it is still a louder hit. Drag one of the chosen notes and they all move, and the arrow keys move them too.
Cmd C copies what is chosen, Cmd X cuts it, and Cmd V puts it into the bar in sight, at the same place in the bar. When the bar in sight is the one it came from, it goes into the next bar, so copying a bar and pasting it fills the bar after it. It goes into another pattern of the same kind as well: click in that one first. Delete takes out what is chosen, Cmd A chooses everything and Escape lets it go.
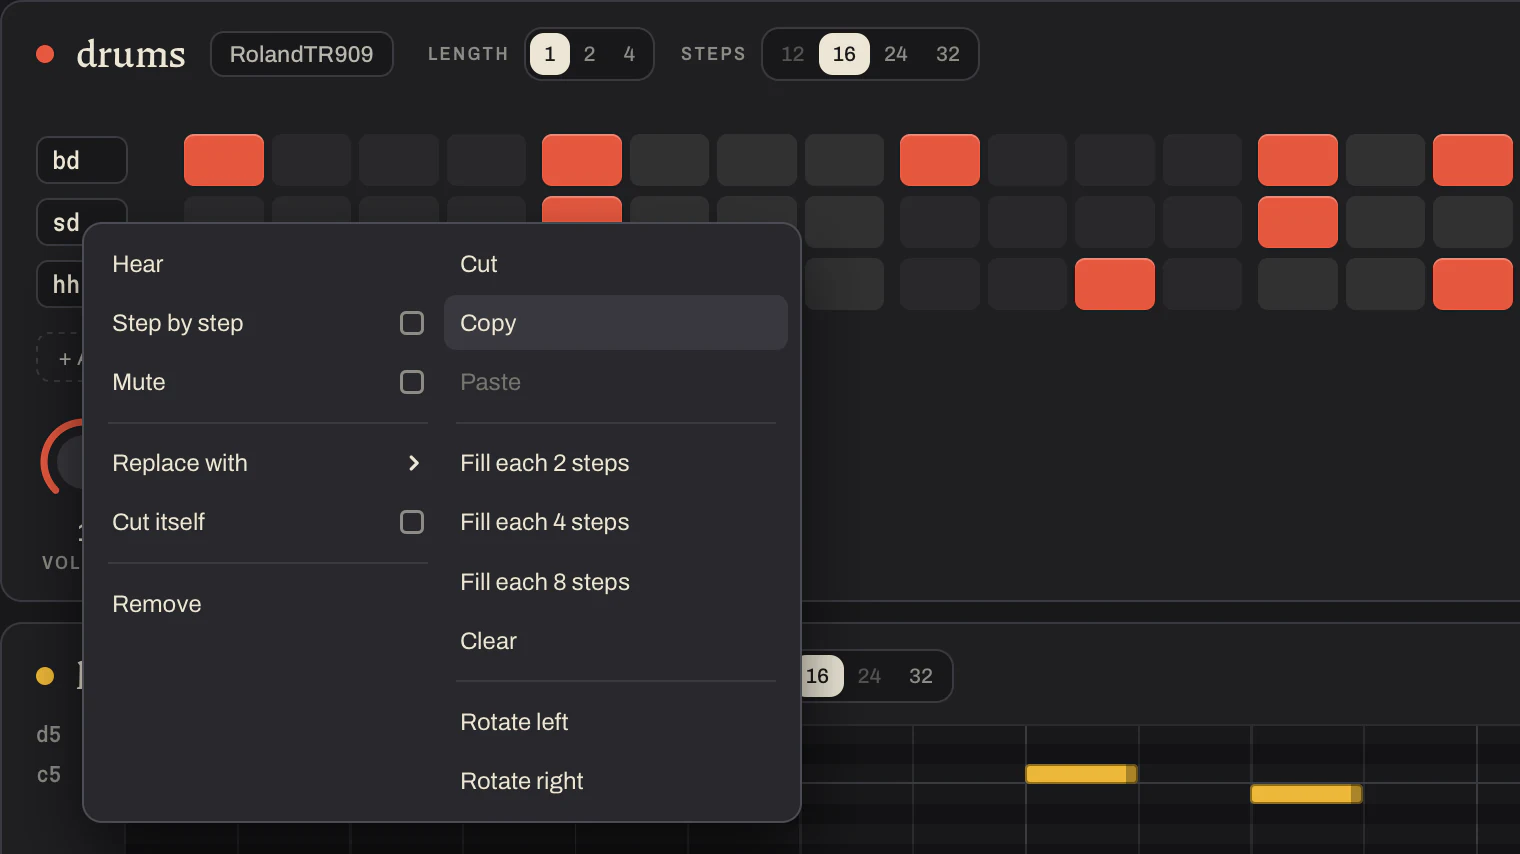
A right click on the name of a sound in a drum grid opens what can be done with its whole row: hear it, give it another sound, let it cut itself off when it is hit again, copy it and paste it onto another row, fill it on every 2, 4 or 8 steps, clear it, or move it a step left or right.
Sounds
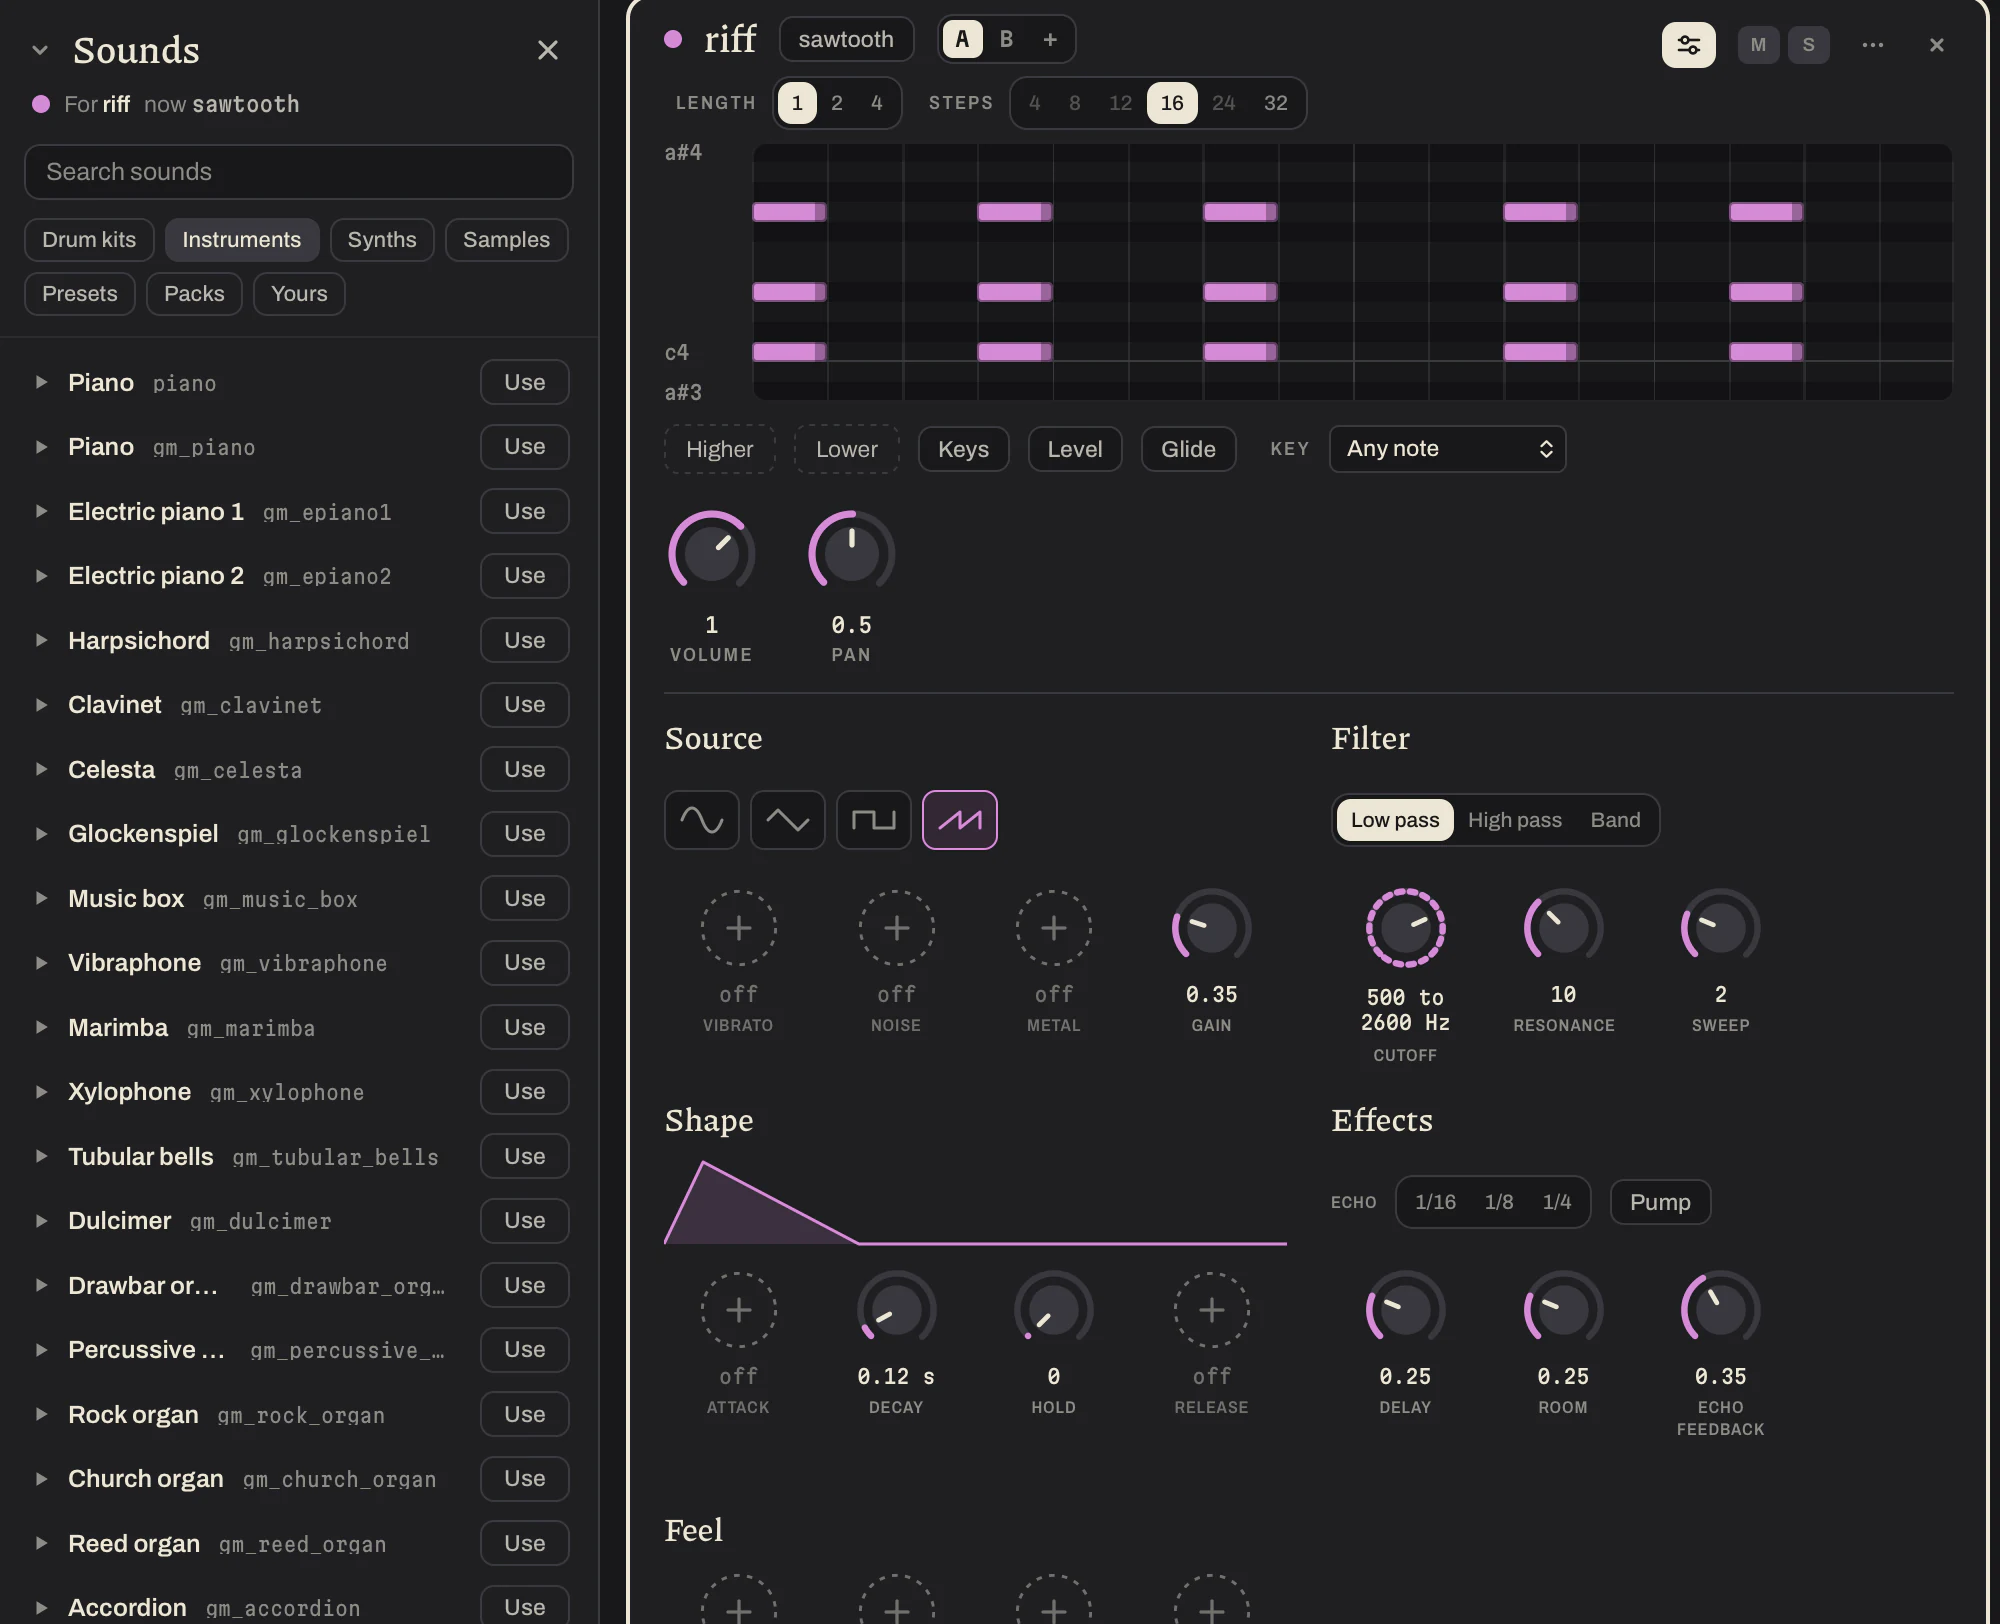
Click the name of the sound on a strip. The Sounds open on the left: drum kits, instruments, synths, samples and your own. Click one to hear it, press Use to give it to the pattern, or drag it onto a strip.
The button with the sliders on a strip opens every control of its sound: Source, Filter, Shape, Effects and Feel. A faint knob is one the sound does not use yet. Press it and it is added, to the sound and to the code. Browse all controls finds the rest by name.
Volume is how loud a pattern is after its effects, like a fader. Gain, among the controls of the sound, is how hard the sound goes into its filter and effects: on an overdriven sound it changes the bite far more than the loudness.
A knob can move by itself. Point at it and press the small wave at its top left, then choose how it moves, between which two values and over how many bars.
A sound you have shaped can be kept. At the foot of the open controls, Save as preset keeps it under a name with every knob as it stands. It is then among the Presets in the Sounds, beside the twenty that come with Weft Loom, and goes onto a pattern of notes in any song.
Drum kits, instruments and samples are fetched the first time they are played, and kept on your machine. Without a network, the ones you have played before still play.
The song
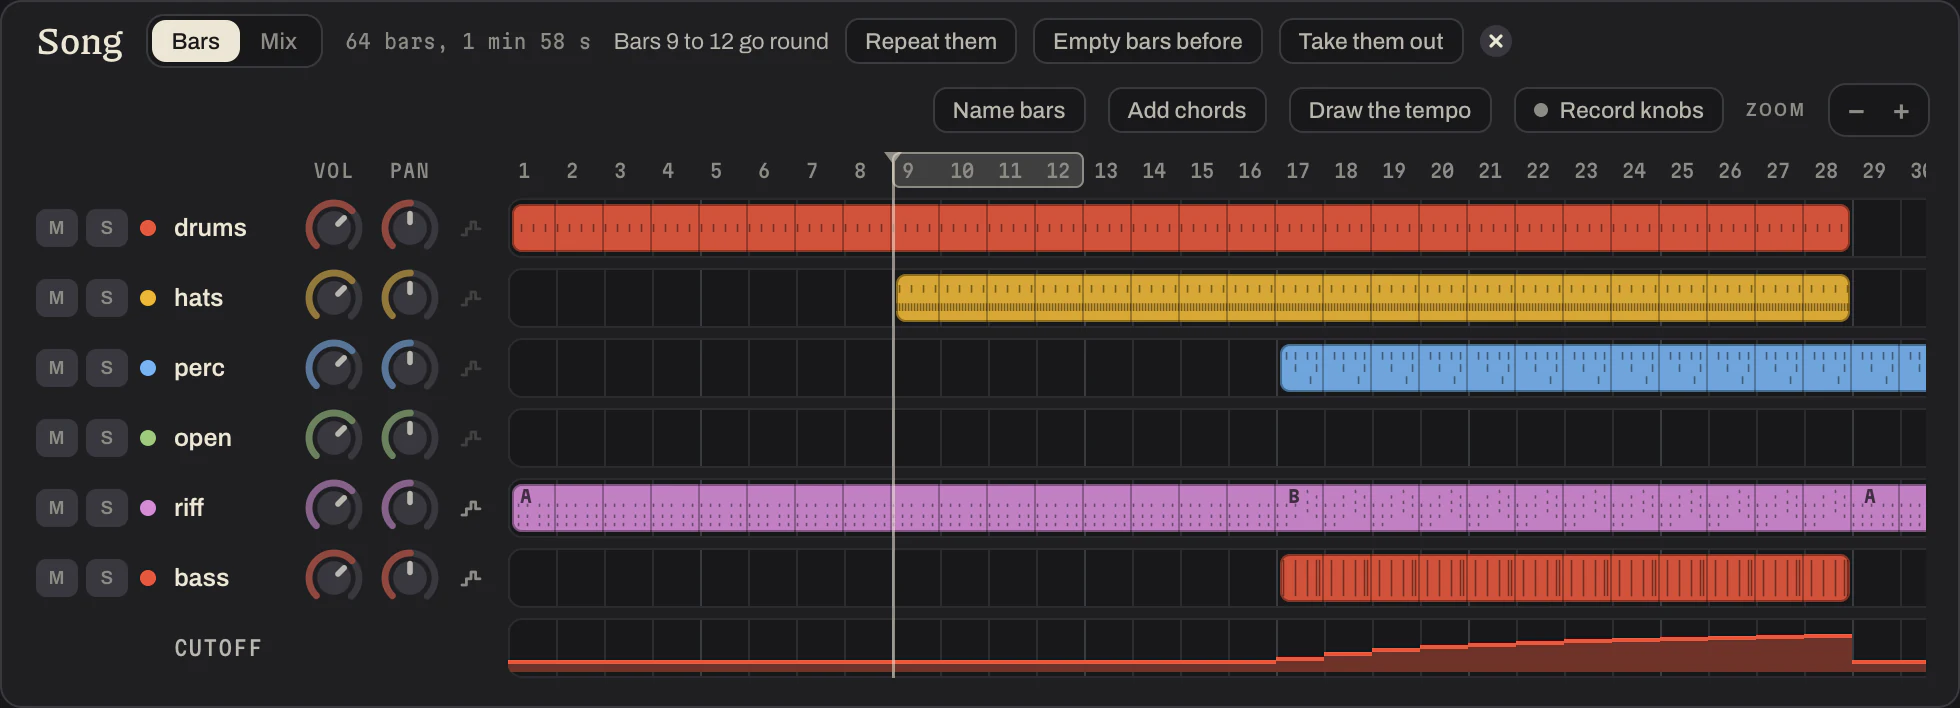
The Song panel is the song from left to right: a row for each pattern, a cell for each bar. Drag across a row to fill bars or to empty them. A pattern plays in the bars that are filled, and the song is as long as its last filled bar.
Each row has M and S, and a knob for volume and for pan.
Click a bar number to start from that bar. Drag across bar numbers and those bars go round, which is the way to work on one part of a song. While they go round, three buttons work on them in every pattern at once: Repeat them puts them in once more, Empty bars before makes room in front of them, and Take them out removes them.
A pattern you have just added plays in no bar yet. In Live you hear it at once; in Song you hear it once you fill bars for it.
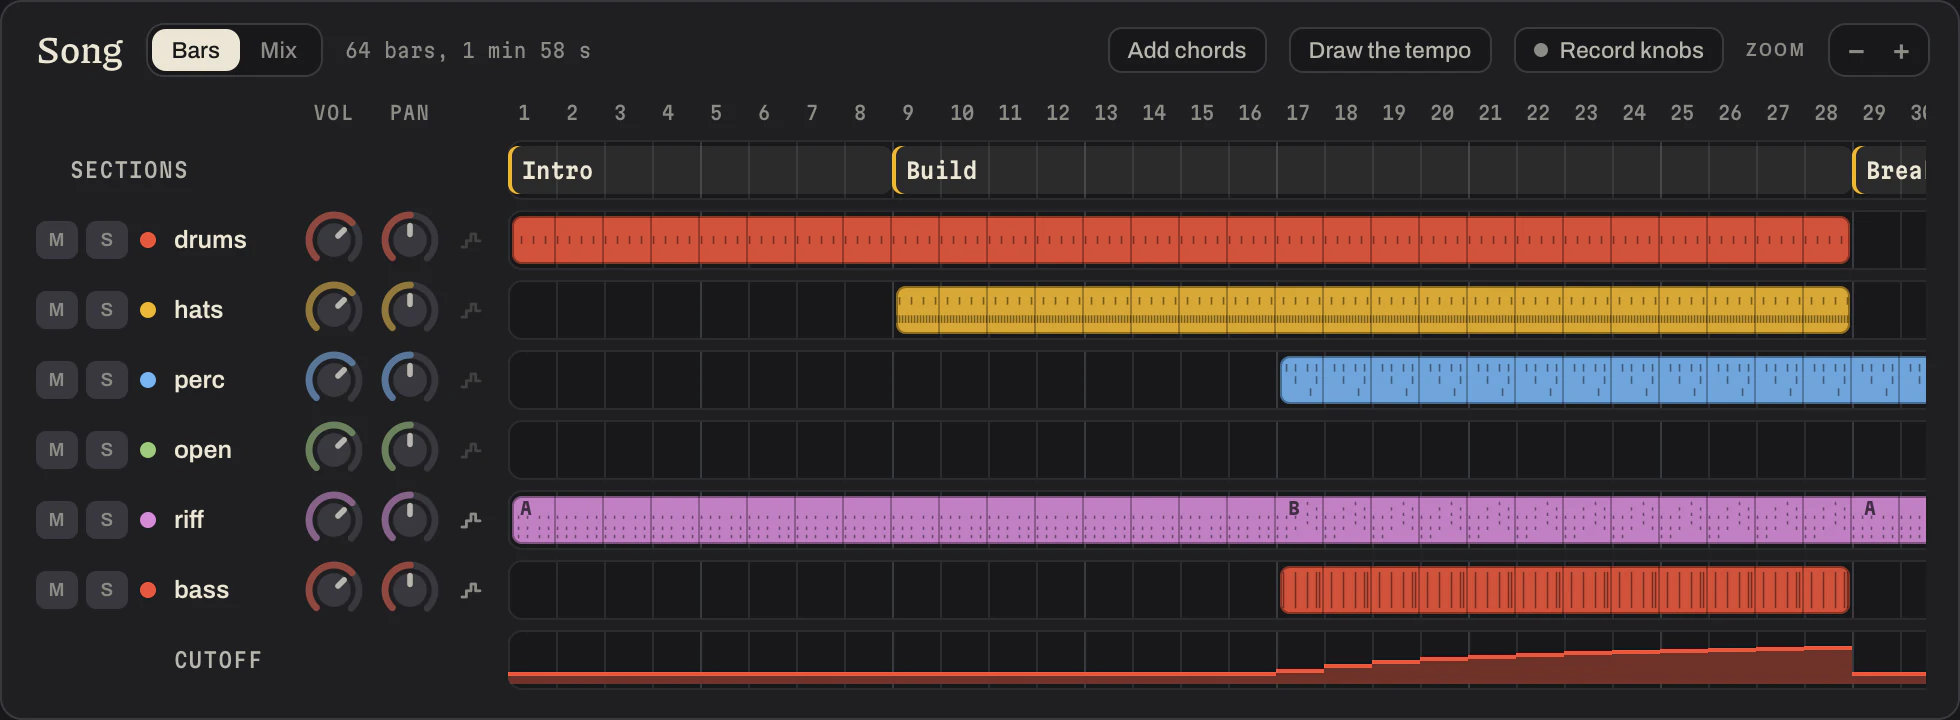
Bars can have a name over them, such as Intro, Verse or Drop. Press Name bars, then drag over bars in the Sections row and type a name. Press a section to start from it, and press it twice to rename it; clear its name to take it off. Sections move with the bars when bars are repeated, put in or taken out.
Tempo and time
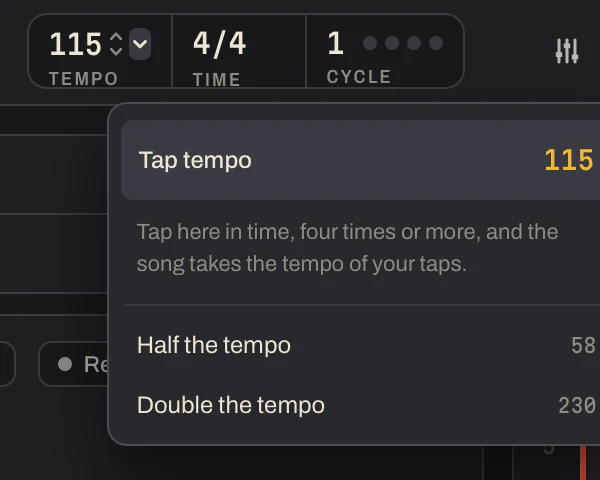
The tempo is the number at the top, in beats a minute. Beside it is the Time: 4/4 to begin with, and 2/4, 3/4, 5/4, 6/8, 7/8 or 12/8 for a song that is counted another way. A new pattern gets the steps of that bar, and the lights beside the tempo count its beats. The time is one for the whole song, and the patterns a song already has stay as they are.
The arrows beside the tempo make it a beat faster or slower, ten with Shift, and go on while you hold them. The menu beside them has Tap tempo, to tap the tempo in time, and halves or doubles it.
A song can also speed up, slow down or change tempo. In the Song panel press Draw the tempo. A Tempo row appears over the patterns: drag in it to set the tempo bar by bar, and hold Shift for a straight line. The length of the song follows it, and so does a file you export.
The cross beside Tempo gives the song one tempo again.

Chords
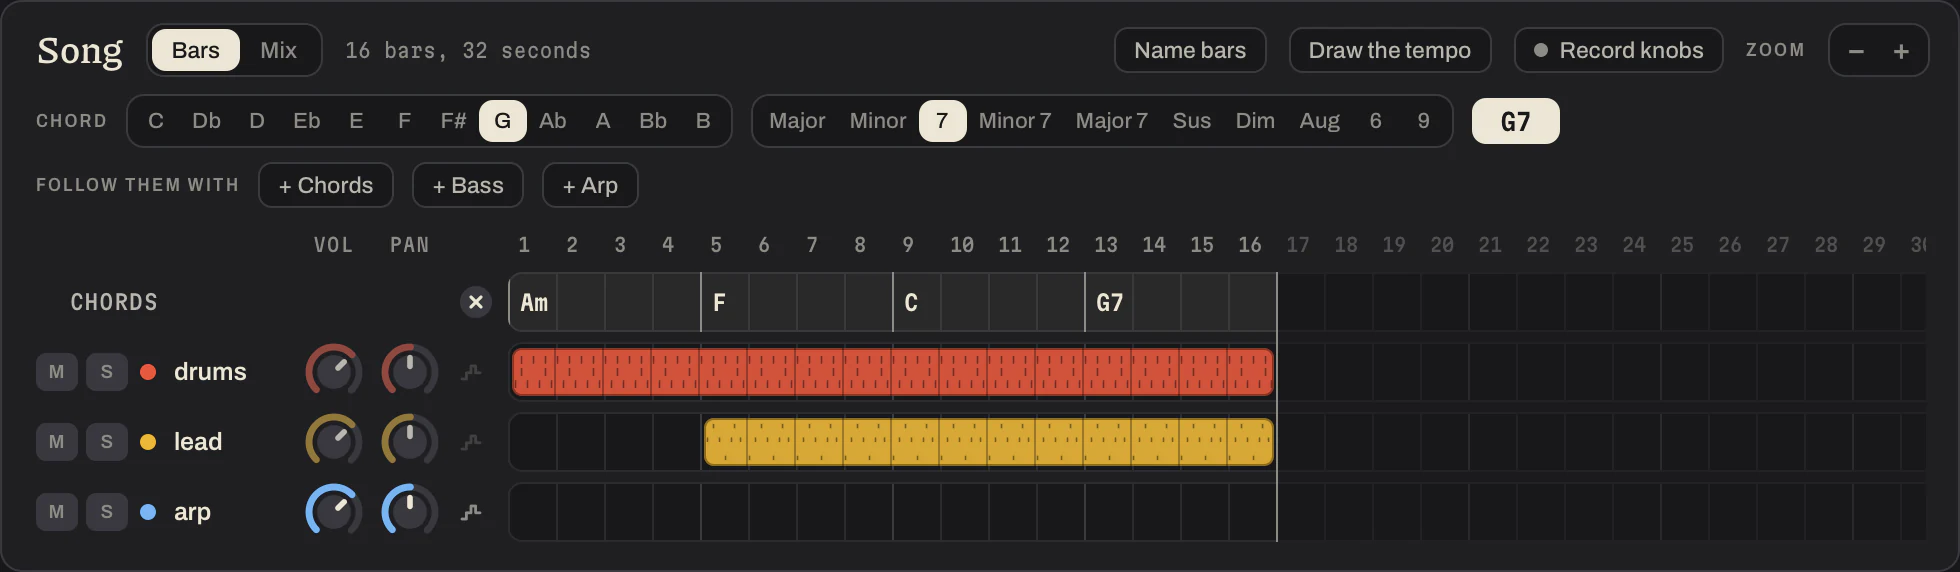
A song can have chords that its patterns follow. In the Song panel press Add chords. A Chords row appears with a chord for every bar. Choose a note and a kind above it, then press or drag over bars to put that chord there.
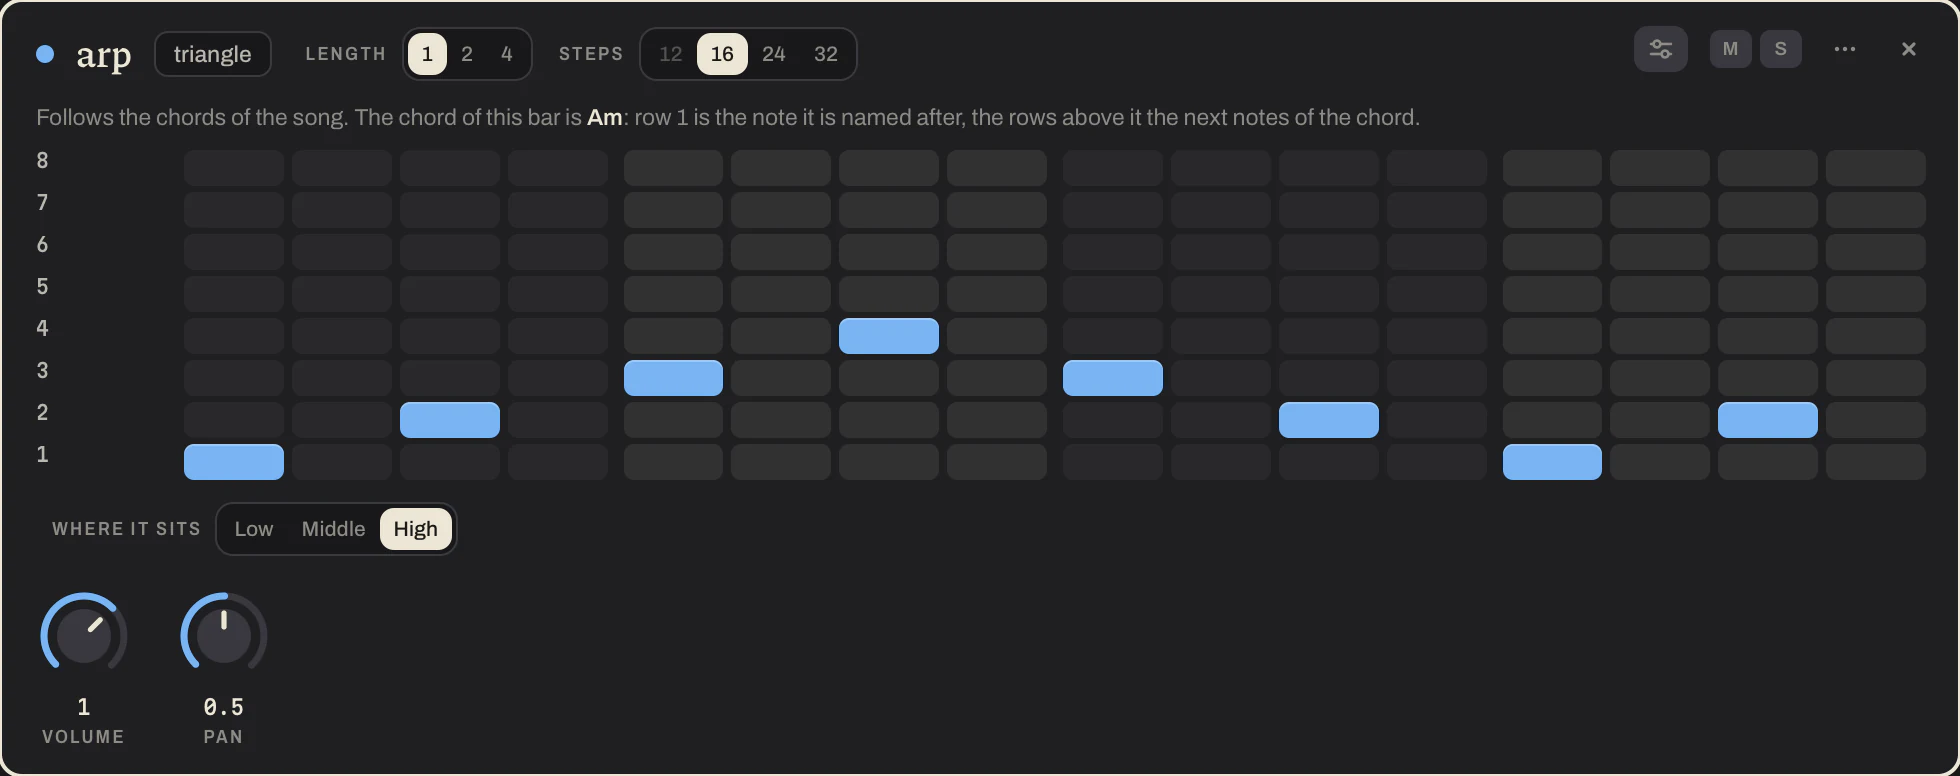
Follow them with adds a pattern that plays the chord of each bar: Chords plays the whole chord, Bass the note it is named after, and Arp its notes one by one. Its grid has a row for each note of the chord, counted from the bottom, and Where it sits moves it lower or higher. Change a chord in the Chords row and every pattern that follows plays the new one.
The cross beside Chords takes them out of the song. The patterns that followed keep the chords they played, and follow again when you add chords again.
A knob over the song
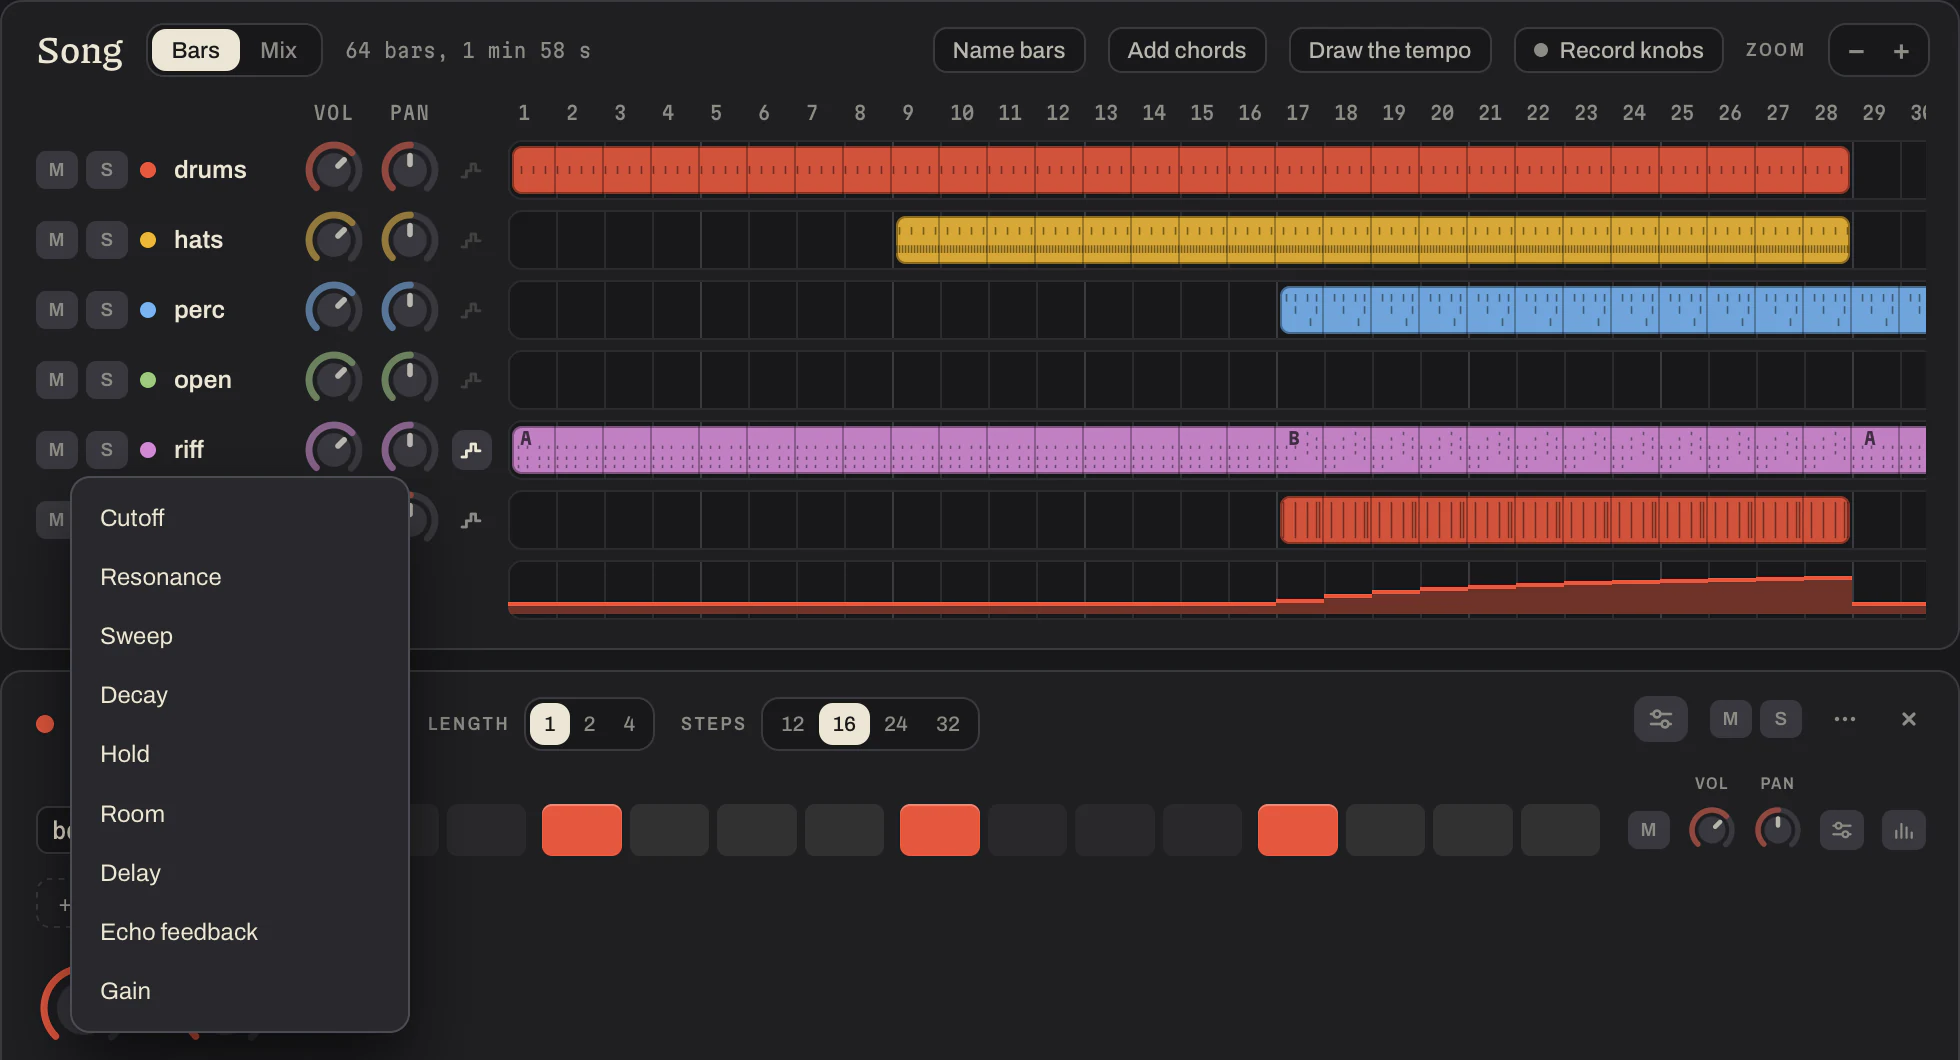
A knob does not have to stand still for the whole song. In the Song panel press the small icon beside a pattern's name and choose one of its knobs. A row appears under the pattern: drag in it to set the knob bar by bar. Hold Shift and drag for a straight line.
You can also play it in. Switch Record knobs on, press play and turn a knob while the song plays. When you stop, what you did is a row in the Song panel.
To let a knob stand still again, point at the name of its row and press the cross.
Versions of a pattern
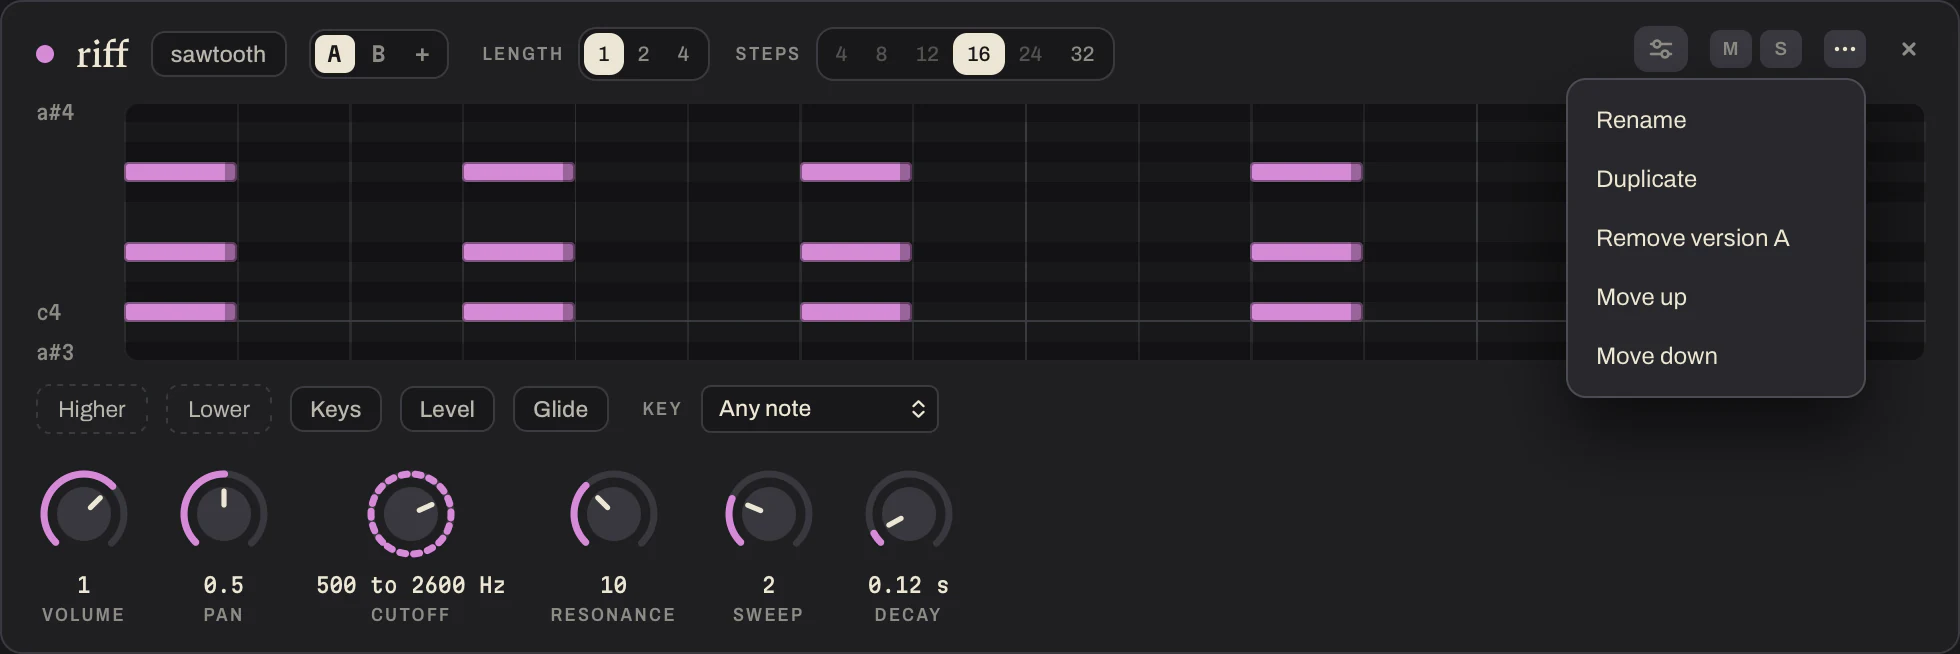
A pattern can play one thing in the verse and another in the chorus, with the same sound and the same knobs. Open the pattern's menu, the three dots, and choose Add a version. The strip gets tabs A and B. B starts as a copy of A, and changing one leaves the other as it was. The plus adds more, up to eight.
In the Song panel, drag across the pattern's bars while a version is shown: those bars play that version and carry its letter.
Remove version, in the same menu, removes the one that is shown.
Scenes
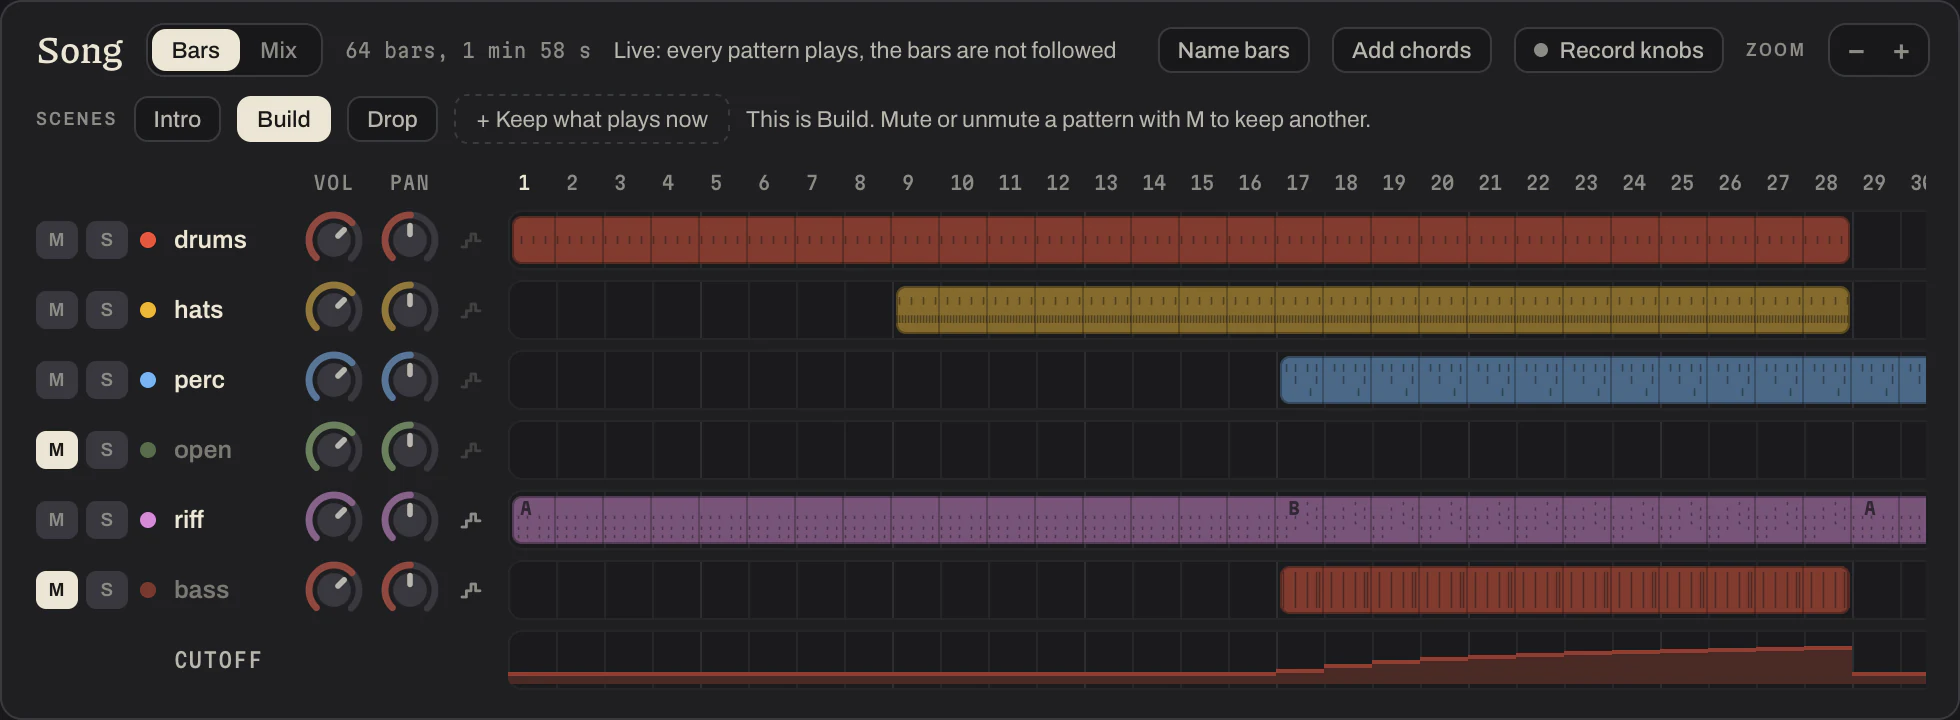
Scenes are for playing a song live. Switch to Live and the Song panel gets a row of them.
A scene is a set of patterns that play together. Mute and unmute patterns until you hear one part of your song, and press Keep what plays now. Do the same for the next part.
While the song plays, press a scene. It waits for the bar to end and comes in on the first beat of the next one. Pressed in the last half second of a bar, it waits for the bar after. Double click a scene to give it a name.
Playing live from the code
For playing a set from the code, two things help. The arrow beside Update chooses when a change comes in: at once, on the next bar, or on the next four bars. While a change waits, the song plays on as it was and the code counts the beats that are left, so the change comes in in time. Only Update and Cmd Enter wait; a knob, a step or a note comes in at once.
The performance view, the button at the top right of the code or Cmd Shift F, puts the code over the whole window, large enough for a projector, with the scenes over it in Live. Cmd + and Cmd - make it larger and smaller, and the size is kept. The strips are out of the window while it is on, so that nothing beside the code takes the window's time from the sound.
Notes from the keyboard
On a piano roll press Keys. The computer's keyboard is now a piano for that pattern: A S D F G H J K are the white keys, W E T Y U the black ones between them, and Z and X go an octave down and up.
With Write on, what you play while the song plays is written into the roll, where you played it and for as long as you held the key. With it off you only hear it.
On a drum grid, Keys makes A S D F and the letters after them its sounds, from the top row down, and Write puts a hit on the step the song is at.
Typing in the code or in a box is still typing.
MIDI
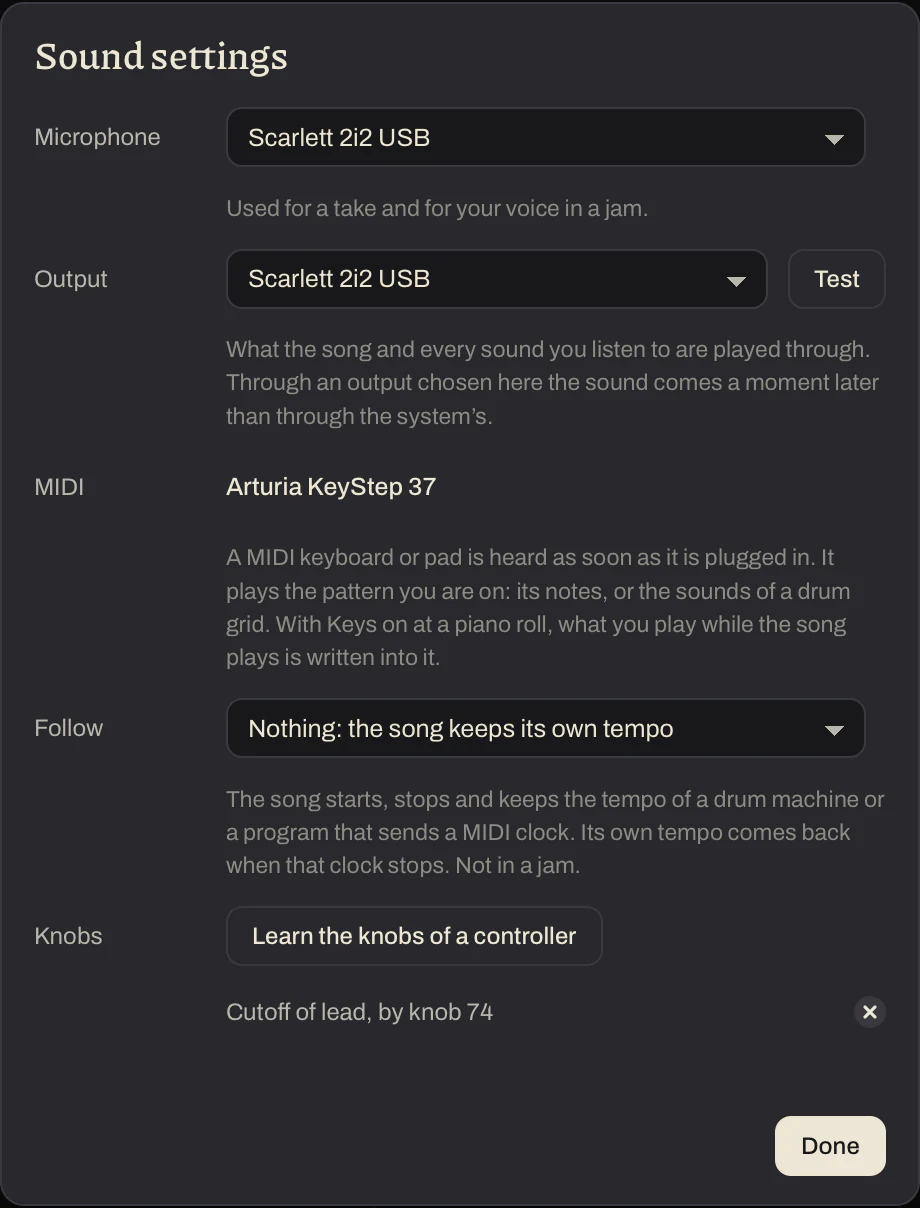
Plug in a MIDI keyboard or pad and it plays at once: the pattern you are on, the notes of a piano roll or the sounds of a drum grid, where the pads go by the drum numbers every machine agrees on. A key sounds for as long as you hold it, and as loud as you pressed it. The sound settings, Devices at the top of the mixer, name the keyboards that are plugged in.
With Keys and Write on, what you play while the song plays is written in, and every note keeps how hard its key was pressed. Level under the roll shows it, and quieter notes are paler. Drag over the bars to change them, and double click one to put it back. A chord keeps how hard each of its keys was pressed. To change one note of a chord, choose it first: the Level bar of that step is then its own.
A pattern can be played by a synth or another music program instead of Weft Loom. Open its sound controls and choose the synth under Played by, and a channel beside it. Each note goes out as hard as its level says, times the pattern's volume.
In the sound settings, Clock sends the tempo of the song to a drum machine or a synth that follows one, with its start and its stop. Follow is the other way round: the song starts, stops and keeps the tempo of a drum machine or a program that sends a MIDI clock, and its own tempo comes back when that clock stops. Learn the knobs of a controller lets a knob or a fader of yours turn a knob of the app: press the knob in the app, then turn yours. It turns that knob in every song that has the same pattern and the same knob.
On a Mac and on Linux, other music programs on the same computer see Weft Loom as a MIDI device. They can play it as they would a keyboard and send it their clock, and a pattern can be played by them: choose other programs under Played by.
Export has MIDI (.mid): a track for every pattern of notes or drums, to open in another music program. Open a File takes a MIDI file and makes a song of it, a piano roll for each instrument and a drum grid for the drums. A long file is cut into parts of eight bars, each a pattern that plays in its own bars, and a part that comes again is the same pattern again.

Your own sounds
In the Sounds choose Yours. Add audio files takes recordings you have, and Record takes one from the microphone.
Use one on a pattern of notes and it is played higher and lower with the notes. Use it on a drum pattern and it becomes a row of the grid.
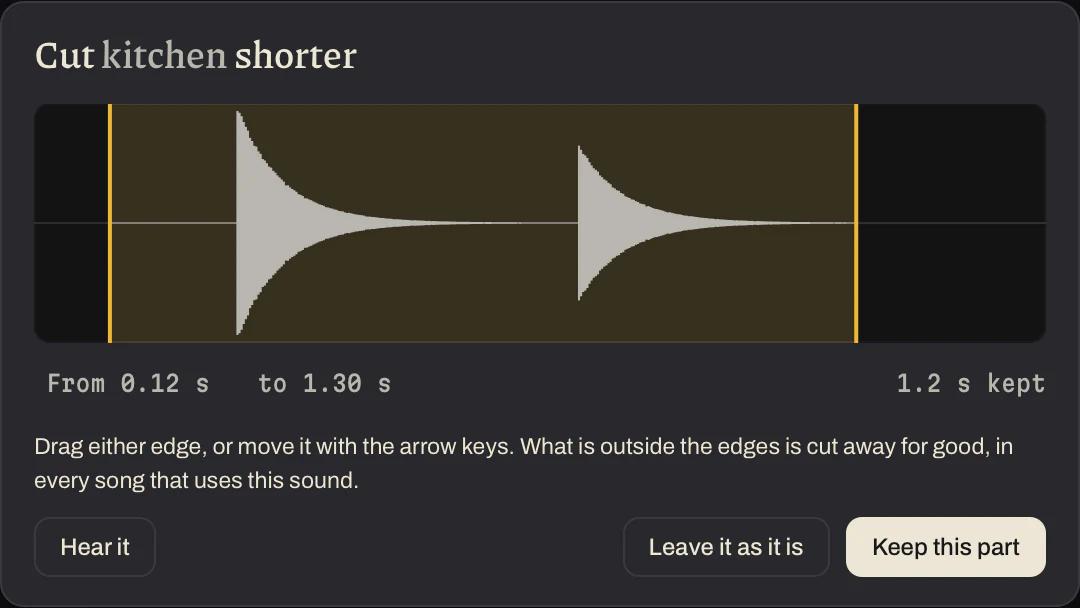
To cut the silence off a sound, point at it in the list and press the button with the two bars. Drag the two edges, press Hear it, then Keep this part.
Your sounds travel with the song: into a song file, to the other person in a jam, and to the site when you publish.
A sample cut into parts
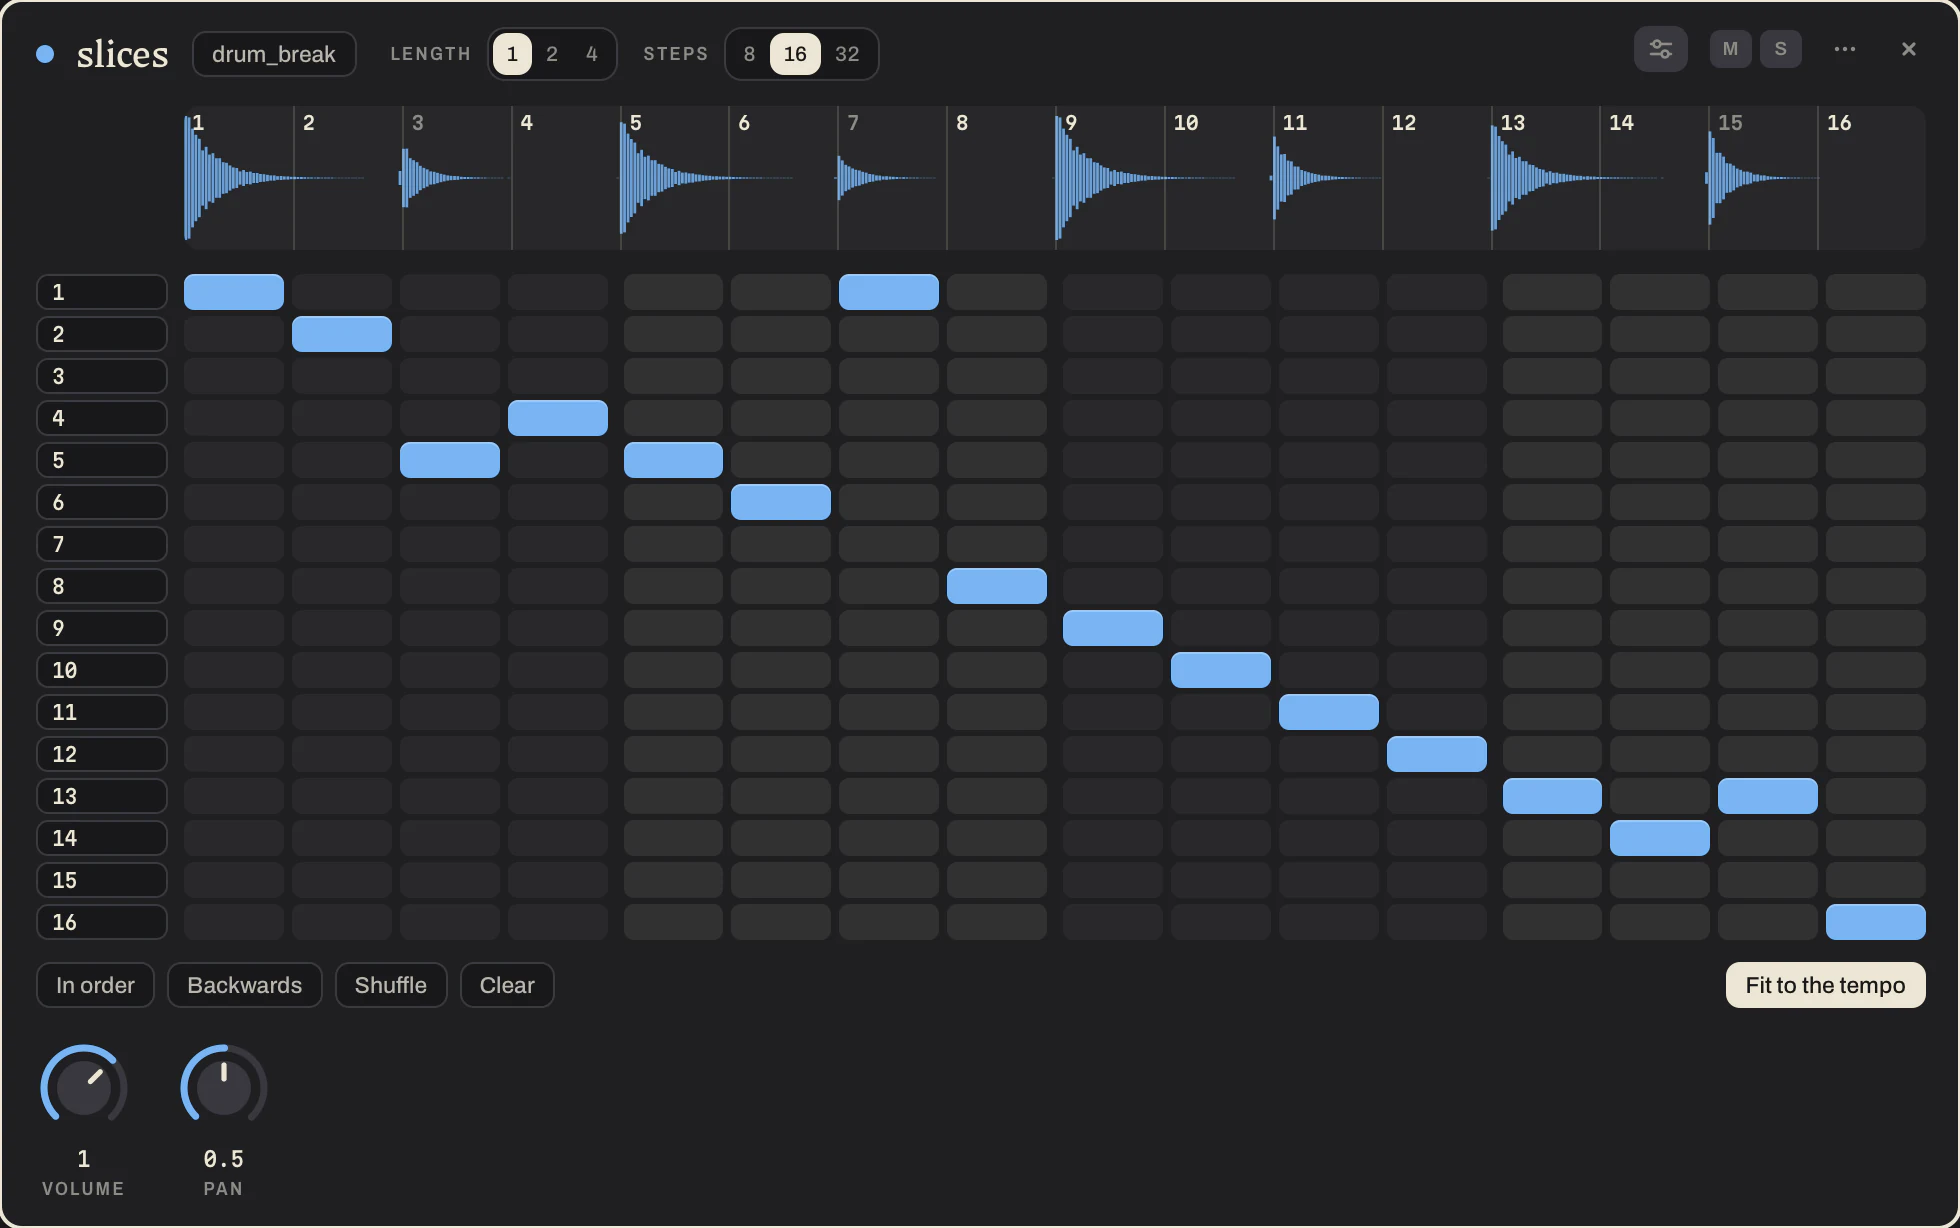
A drum loop, or any sample, can be cut into equal parts and played in another order. Beside a sample and beside a sound of your own in the Sounds is a button with three boxes. Press it and a new pattern appears, with the sound drawn at its top and cut into as many parts as the pattern has steps.
Each part is a row of the grid, and a hit plays that part on that step. The parts in a line from the top left down are the sound as it was. Click to move them about, or press In order, Backwards, Shuffle or Clear. A press on a part in the drawing plays it.
With Fit to the tempo on, each part is played as fast as fills its step, so a loop follows the tempo of the song and its pitch moves with it. Off, each part plays as fast as it was recorded.
A recording along the song
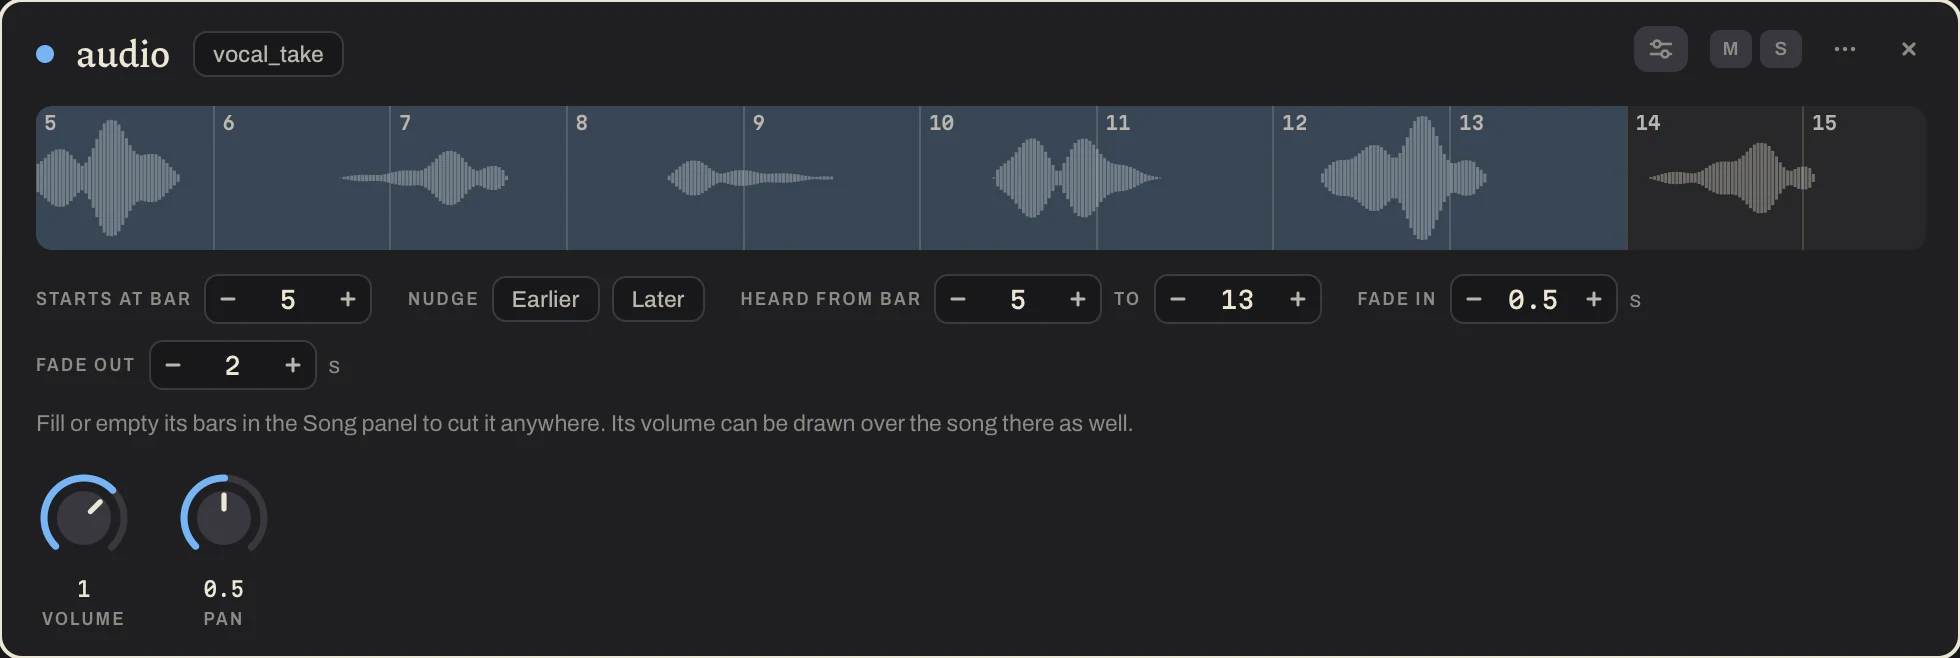
A sung take, a guitar, anything longer than a bar can play along the song as it is. In the Sounds choose Yours and press the button with the wave beside a sound. It is laid on the bars from the bar the song is at, and the song is made longer if it has to be. A take you record while the song plays in Song goes where you sang it. With the count-in on, press Record with the song stopped: the song starts after a bar of clicks, and the take starts where the song does.
Its strip shows the recording with the bars of the song over it, and a press plays it from there. Starts at bar moves it, and Nudge moves it by 10 milliseconds at a time, for a take that came out a little late. Heard from bar and to cut it at both ends. To cut it anywhere else, empty its bars in the Song panel where it should rest. Fade in brings it in over that many seconds, and Fade out lets it go on for that many after its last bar while it fades.
A recording keeps the speed it was made at. Change the tempo afterwards and it still plays without a break, but no longer on the beat.
Packs
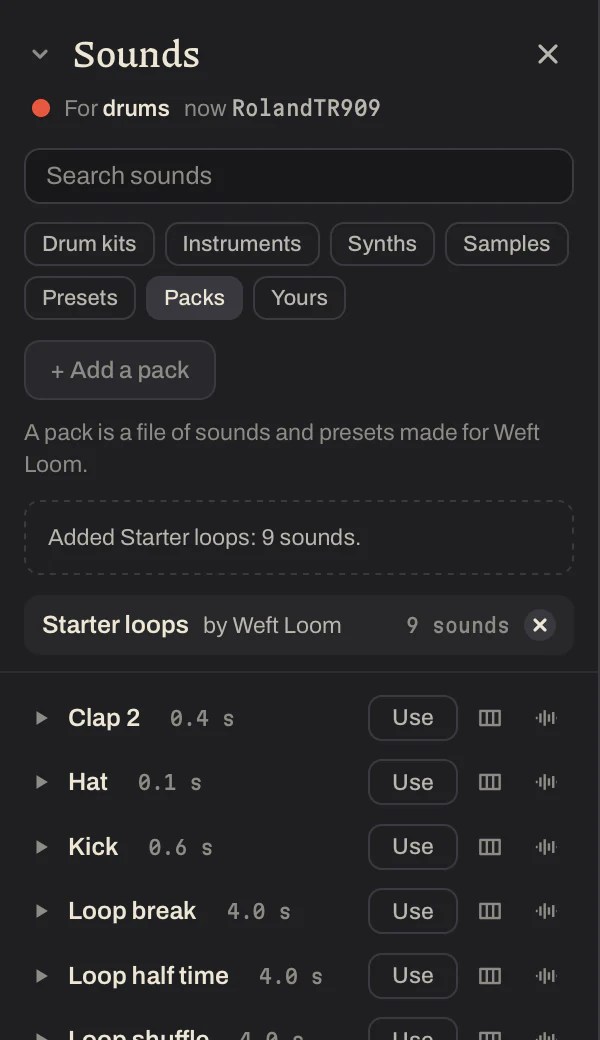
A pack is one file with sounds and presets in it, made for Weft Loom: drum loops, single hits, instruments, whatever its maker put in. In the Sounds choose Packs and press Add a pack. The pack is listed with who made it, and its sounds are under it.
A sound from a pack goes wherever a sound of your own goes: a row in a drum grid, the sound of a pattern of notes, a loop to cut into parts, a recording along the song. Its presets are among the Presets, under the pack's name. A song that uses a sound from a pack carries that sound along, so it plays for whoever opens it, with the pack or without.
To make a pack, choose Yours and press Make a pack. Give it a name, choose which of your sounds and presets go in, and save it. The file is the pack: give it to anyone who uses Weft Loom.
The mixer
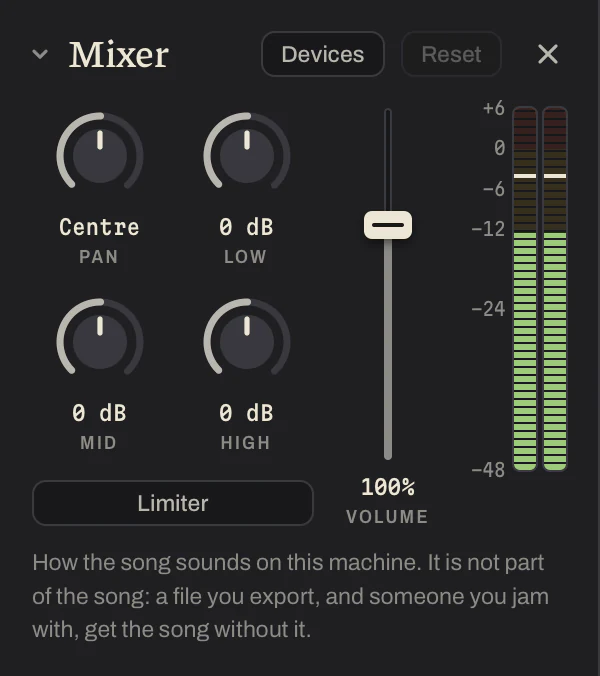
Volume, pan, low, mid and high for everything you hear, with a limiter and two meters.
It is how the song sounds on your machine and not part of the song. A file you export, and someone you jam with, get the song without it.
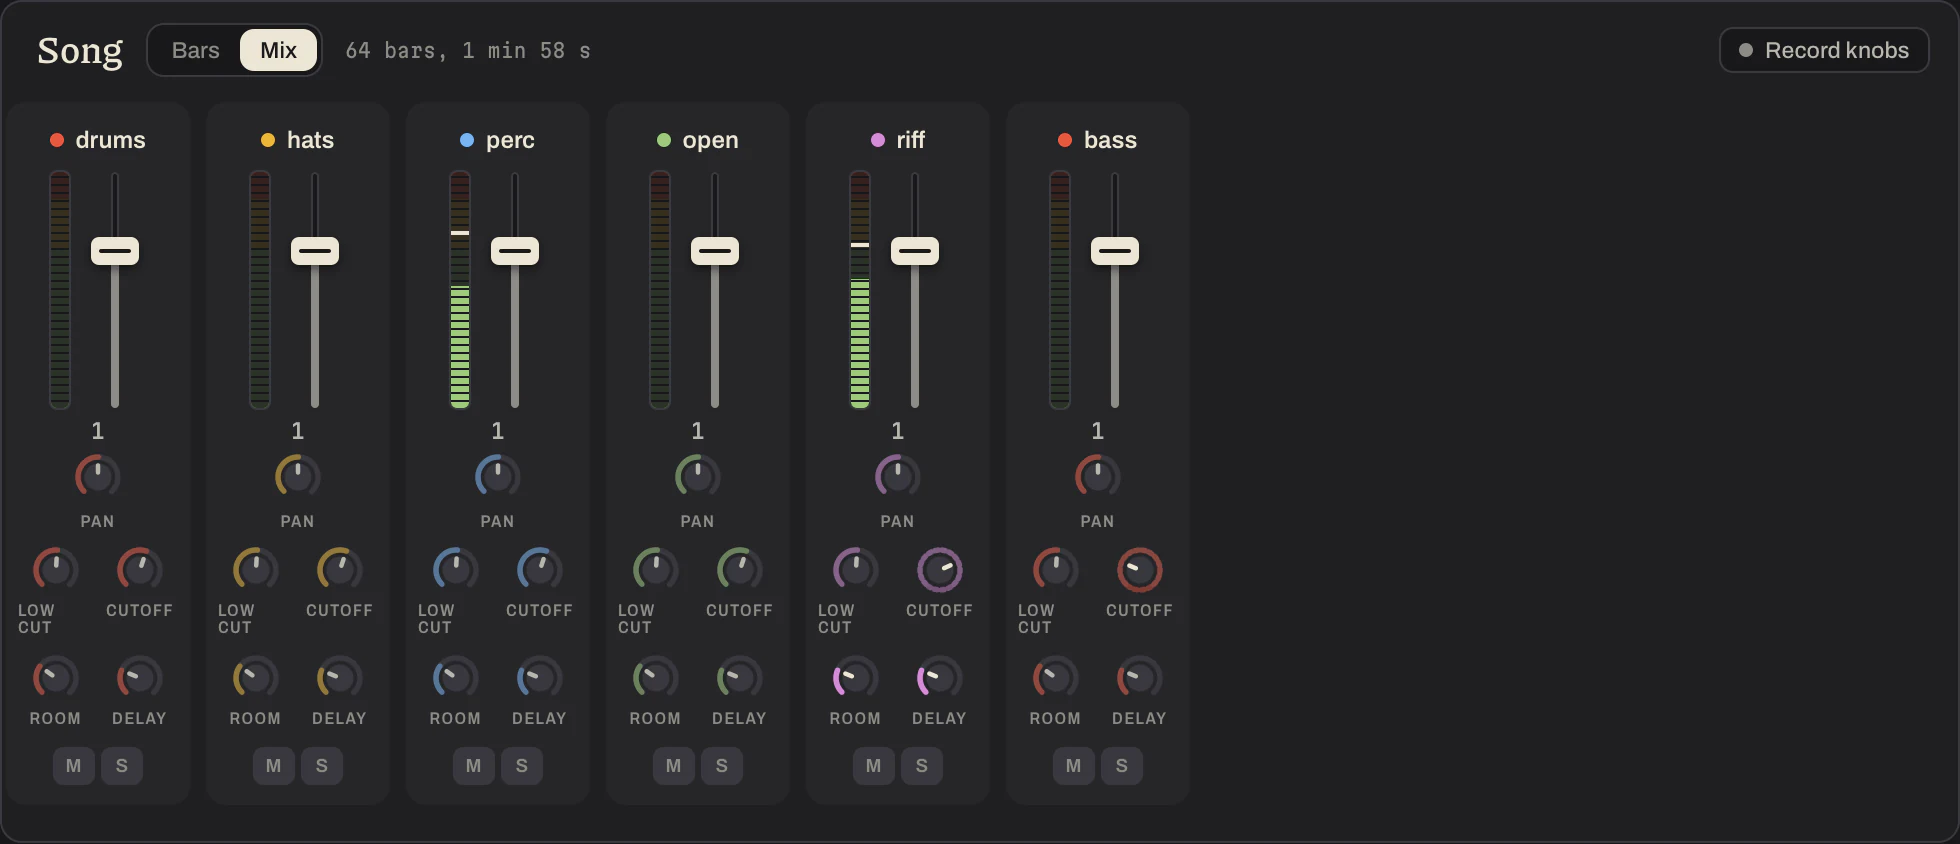
Each pattern has a strip of its own as well. In the Song panel switch from Bars to Mix: a meter, a volume fader, pan, low cut, cutoff, room and delay for every pattern, side by side, with M and S. These are the pattern's own knobs, so they are part of the song.
Microphone and output
Weft Loom records from the microphone the system uses and plays through the system's output, until you choose otherwise. Press Devices at the top of the mixer, or choose Sound Settings in the File menu.
Microphone is what a take and your voice in a jam are made with. Output is what the song is played through, and Test plays a short note there. If the list of outputs is empty, press Show the outputs: a window is only told what it could play through once it may use the microphone. Nothing is recorded.
Both go back to the system's own when what you chose is unplugged.
Jams
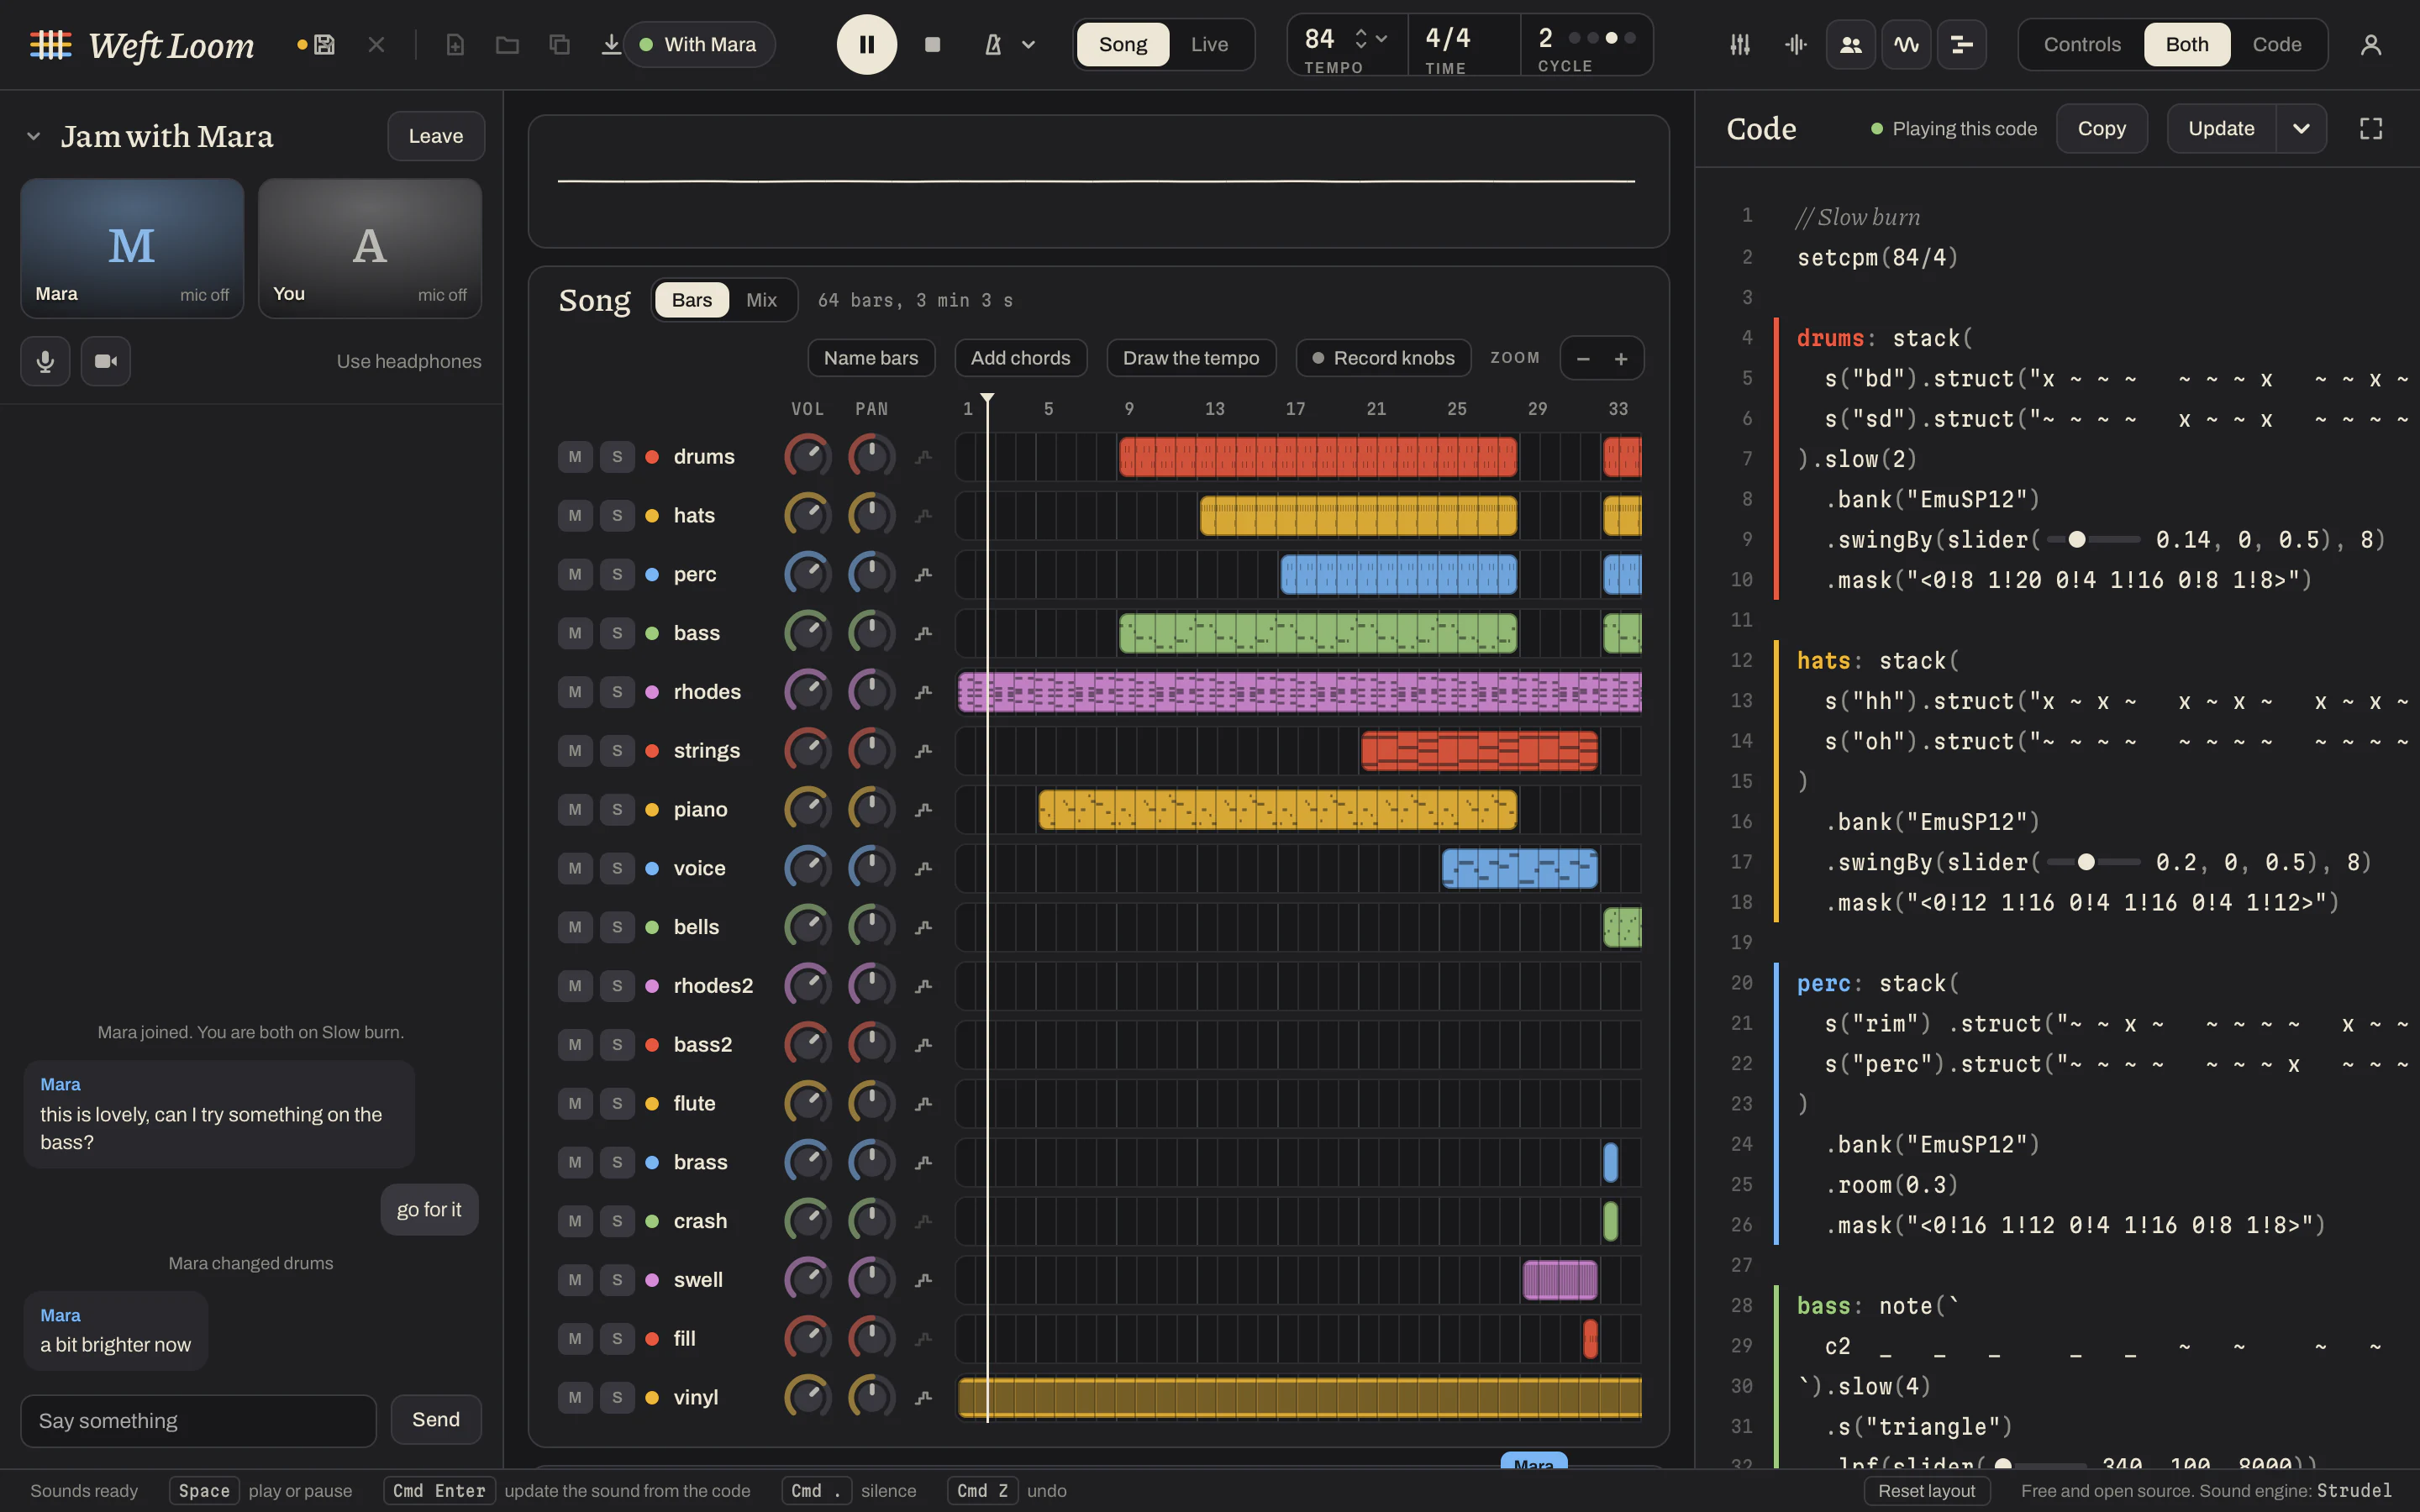
Two people can work on one song at the same time. Open Jams, the two people at the top right, and type a name.
Press Invite someone and send the six characters to the other person, who types them into Invite and presses Join. Or switch Open to jam on: you are then in the list everyone sees in their Jams, anyone can ask to join, and you let them in or not.
Both now have the same song. A step, a note, a knob, a line of code: what one changes, the other gets. Play and stop are for both. There is a chat, and a microphone and a camera to switch on. The Linux app has the chat only.
If a line drops, the jam goes on. Whoever dropped is back in it by themselves within two minutes, with everything the other changed and said meanwhile. Leave ends the jam for both, and each keeps the song.
Saving, exporting, publishing
Weft Loom keeps your songs itself and writes every change down as you make it, so quitting the app loses nothing. Cmd S saves a version you can go back to from the song's menu. Closing a song that has changes asks whether to save them: Close without saving takes it back to the version that was saved.
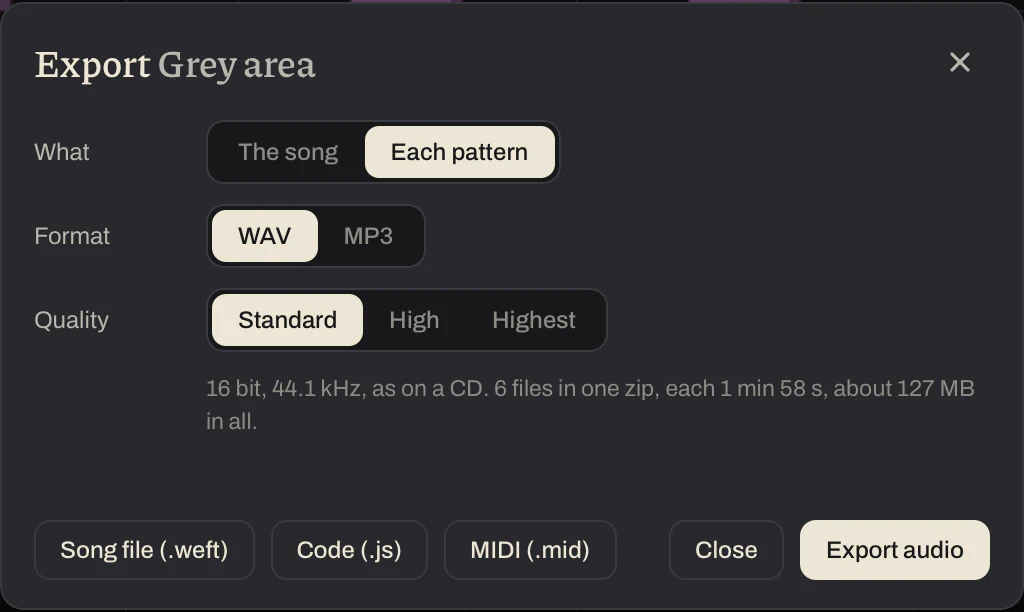
Export makes files. A song file (.weft) is the whole song with your own sounds inside, to open in Weft Loom on another machine or to send to someone. Code (.js) is the code alone. MIDI (.mid) is the notes alone, for another music program. Export audio makes a WAV or an MP3 of the song. With Each pattern chosen it makes a zip with a file for every pattern, all the same length, to mix in another audio program. Loudness For streaming makes the song as loud as music is played on streaming sites, about -14 LUFS, and the note under it says how loud the file came out.
Publish puts a song among the songs on this site, where anyone can listen to half a minute of it, download it and open it in Weft Loom. It needs an account, made in the same window with an email and a password. An account holds ten songs of up to 1 MB each, and Weft Loom makes your own sounds smaller where it has to.
A song from someone else is code. Weft Loom plays it only if it is music code and nothing more. If it holds anything else, it says which line and asks first.
Keys and updates
- Space
- Play or pause
- Cmd Enter
- Play what is in the code
- Cmd .
- Silence
- Cmd Z
- Undo, and with Shift do again
- Cmd S
- Save
- Cmd N
- New song
- Cmd O
- Open a file
- Shift and a drag
- Choose several notes in a roll, or steps in a grid
- Cmd C, X, V
- Copy, cut and paste what is chosen
- Cmd A
- Choose every note of a roll, or every step of the bar in sight
- Arrow keys
- Move the chosen notes in a roll; with Shift, left and right change the length of one
- Delete
- Take out what is chosen
Weft Loom looks for a newer version of itself when it starts, and offers it in a card at the bottom right. Update and restart puts it in.